
Booking products
A booking product is one bookable offer in Periode. It can represent a sauna, room, court, class, course, event-style session, treatment, rental slot, or any other time a customer can reserve.
The booking product is the template. It defines the normal customer-facing rules: name, description, schedule, duration, capacity, price, VAT, refund settings, waiver, optional extras, member prices, and access setup. The booking calendar contains the published sessions customers can actually book.
Use this guide for product setup. Use Booking calendar for day-to-day operations on live sessions.
Booking products and sessions
Product template
The product template controls the normal rules. Edit the product when a change should repeat or apply broadly, such as a new weekly schedule, default duration, price, member price, cancellation deadline, waiver, or refund rule.
Most settings live under Booking > Products > Edit. The edit screen has a search box, so you can usually type the setting name, such as VAT, Placement, Waiting list, or Waiver, to jump to it.
Published sessions
Published sessions are the real dates and times on the calendar. Customers can only book sessions that have been published and are inside the product’s booking window.
Changing the product template does not always update sessions that are already published. Schedule, capacity, and resource changes may need to be published again for the affected dates. Price changes normally apply to published dates when saved.
When to create a separate product
Create a separate booking product when the offer needs its own rules.
Use separate products for:
- Different locations, rooms, saunas, courts, or activities.
- Guided sessions that should always have a different price.
- Private and drop-in products with different behaviour.
- Products with different capacity, waiver, access, reporting, or membership rules.
- Add-on style products that need their own visibility or reporting.
Use named sessions when the slot is only a variation inside the same product and can share the same rules.
Create and edit a product
Basic details
Create booking products from the Booking area in the Backoffice. Give the product a clear customer-facing name and choose the product type that best matches the offer.
The product editor has many settings, so use the search box at the top of it instead of scrolling. Type part of a setting’s name, such as “prices”, “waiver” or “capacity”, and the editor shows only the settings that match. Clear the box to see everything again.
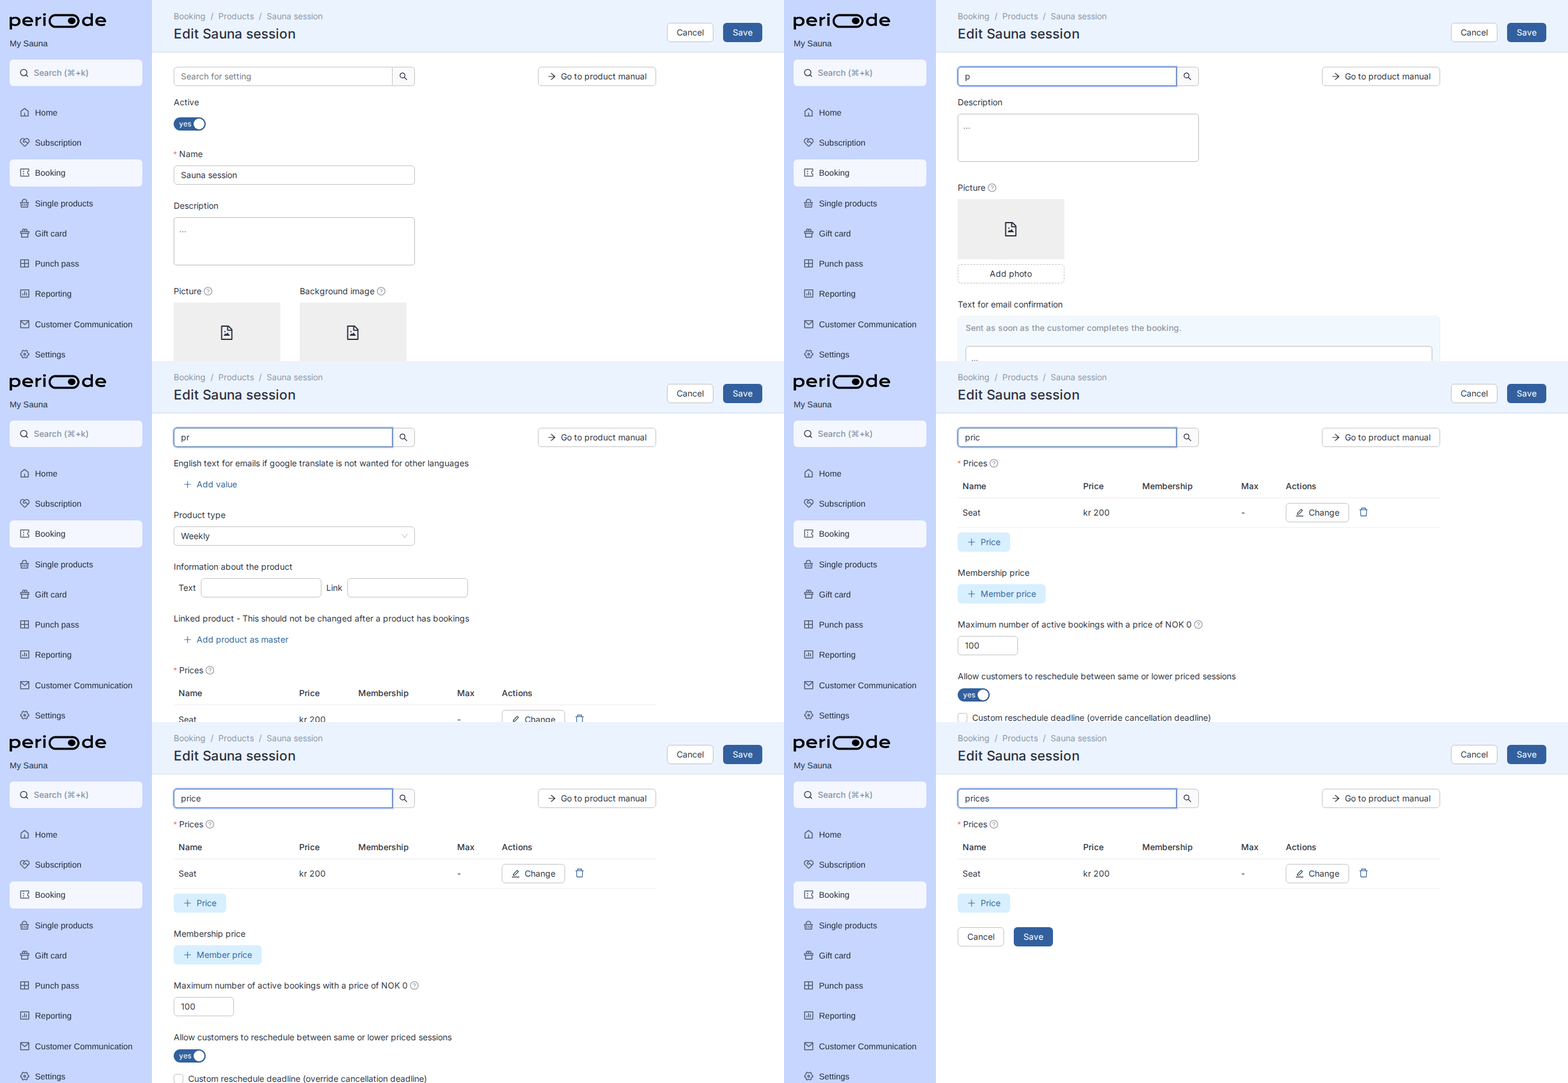
Review these fields before launch:
- Product name.
- Product type.
- Customer-facing description.
- Image or background where used.
- Price and VAT.
- Schedule and booking window.
- Capacity.
- Cancellation deadline.
- Refund type.
- Waiver and required customer information.
- Confirmation text.
- Access or door-code setup.
Product name and translations
The product name appears in customer pages, emails, confirmations, and reports. Use a name customers will recognize.
If you use invented words, brand names, or terms that should never be translated, add an override under Settings > Translations. Automatic translation can otherwise rewrite unusual words into something unintended.
Duplicating products
When you need several similar products, duplicate an existing product and adjust the differences. This is usually faster than recreating every setting.
After duplicating, review:
- Name and description.
- Price tiers.
- Capacity.
- Schedule.
- Door access.
- Waiver.
- Linked products.
- Booking group membership.
- Sharing link.
Deactivating and archiving a product
To take a product out of use, open it, turn off Active at the top, then Archive it. Deactivating stops the product being offered for new bookings, and archiving moves it out of your normal product lists while keeping its history. Existing bookings are not affected. This is the tidy way to remove old, duplicate, or test products you no longer need.
Publishing
What publishing means
Publishing turns the product schedule into actual bookable sessions on specific dates. A product can have a weekly schedule, but customers cannot book a date until the sessions for that date are published.
Automatic publishing
Many products use automatic publishing so new dates are created overnight and the calendar stays filled up to the future booking limit.
Use this when your normal schedule should continue without manual work. Still check the calendar after major schedule changes, closures, or seasonal updates.
Future booking limit
The future booking limit controls how far ahead customers can see and book sessions. Raise it to open more future dates. Lower it if you want customers booking closer to the session date.
If the product should stop after a date, use an end date rather than only lowering the future booking limit.
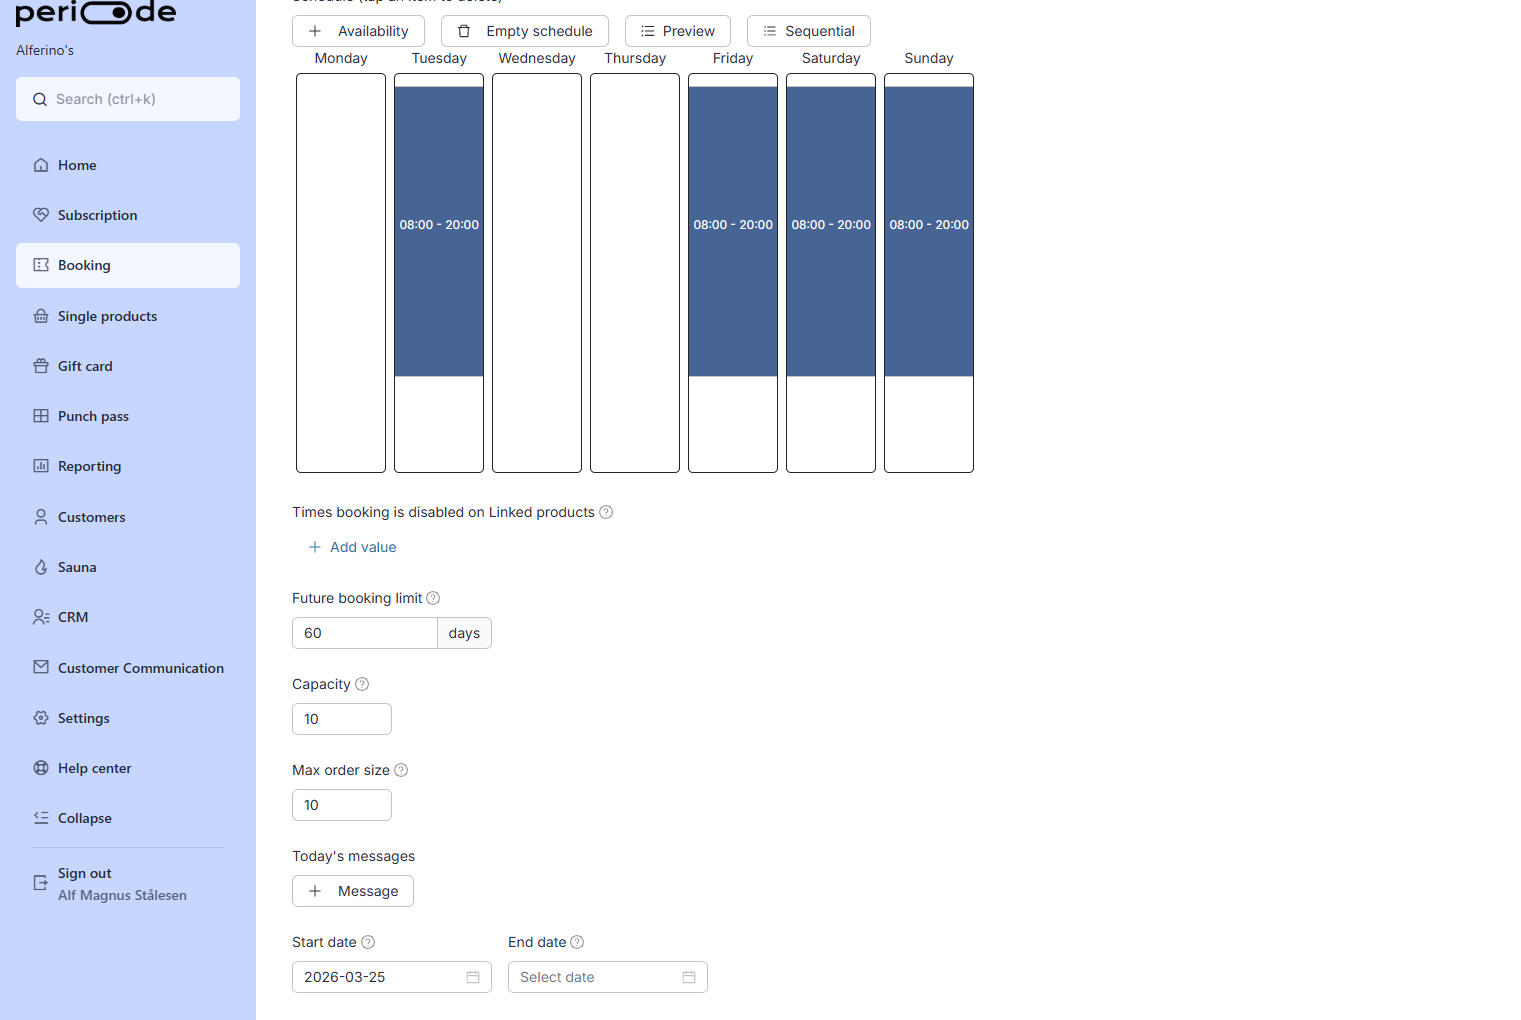
Publishing changes
When you change schedule or capacity, publish the affected dates if those sessions should update on the live calendar.
Before publishing over dates that already have bookings, inspect the preview and consider what should happen to existing customers. Publishing is not a substitute for contacting, moving, cancelling, or refunding customers already booked into affected sessions.
Closed days
Use closed days for holidays, maintenance, private events, staff days, or other dates where the normal weekly schedule should not be available.
Removing a closed day allows sessions to be published again for that date.
Prices and price tiers
Standard prices
Prices are set per booking product. Open the product under Booking > Products and search for “prices” to find the Prices setting.
A simple booking product may only need one price. More advanced products can use several price tiers, such as adult, child, student, member, private, or campaign prices. Each row in the Prices table is one tier the customer can pick at checkout.
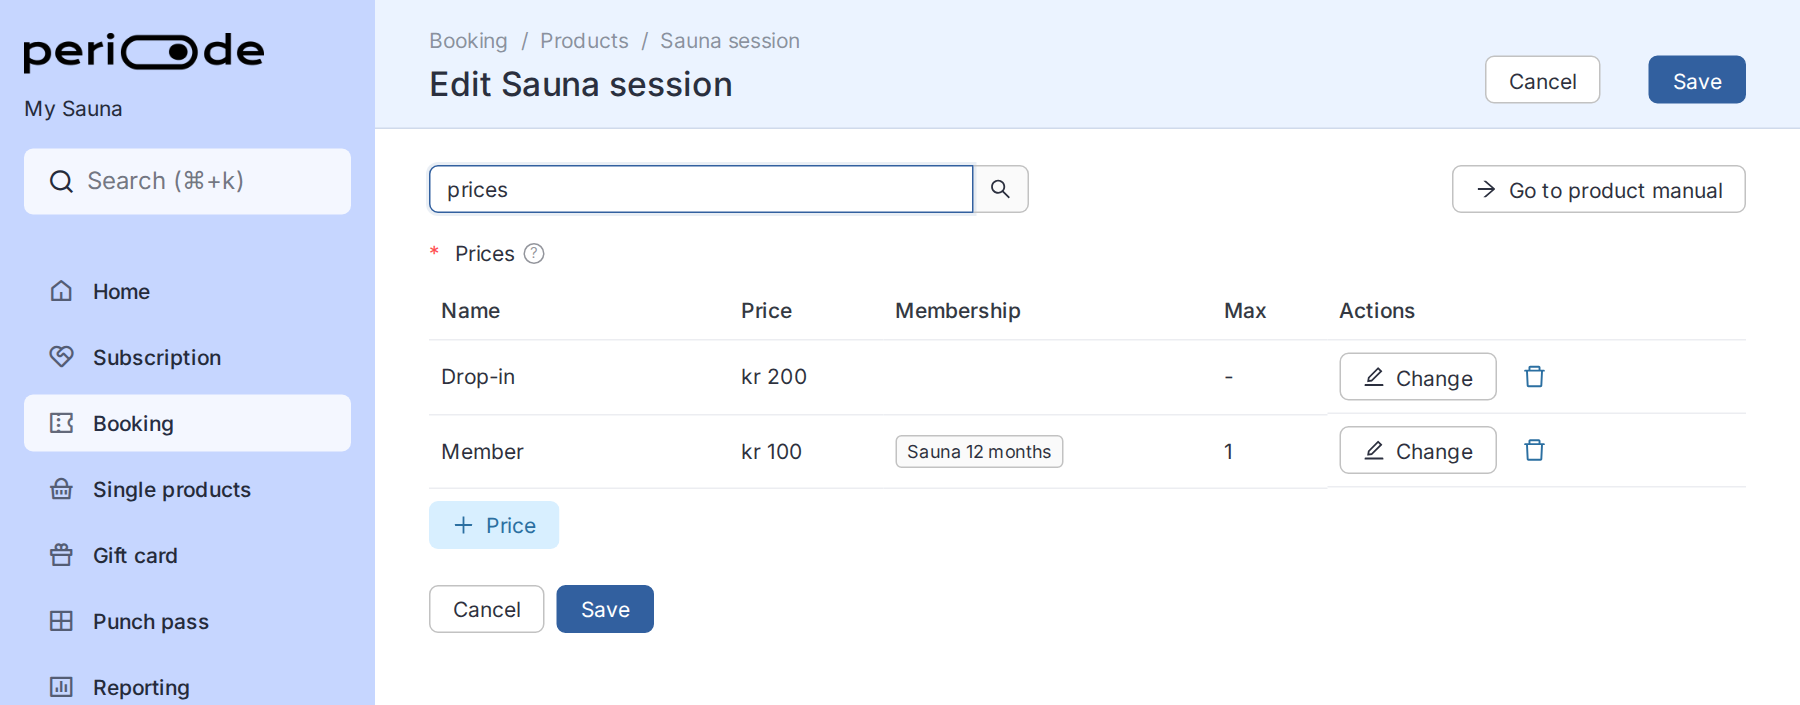
Each tier has:
- Name: the label the customer sees, such as “Drop-in” or “Member”.
- Price: what the customer pays for one seat in this tier.
- Max: how many seats can be bought with this tier in one booking. Empty means up to the product’s capacity.
- Only for members: the membership a customer must have to pick this tier. See Member prices.
The Price is always the price of one booked seat. It is never a monthly or yearly amount.
How many seats are preselected
When a customer opens the booking page, Periode preselects one seat so the simplest booking is one click away. On a product with several price tiers, the seat lands on the first tier that has no membership requirement, or on the member tier when the customer is logged in and has that membership.
Two settings under Advanced on each price tier control this. Open the booking product under Booking, go to Prices, expand the price tier and open Advanced:
- Minimum amount: the lowest number of seats the customer can set on that tier. Leave it blank or
0to let the customer remove the tier entirely. - Initial amount: the number the tier starts on when the page loads. It overrides the automatic preselection, so a tier with an initial amount is never the one that receives the preselected seat.
To make every tier start on 0, so the customer actively picks both ticket type and quantity, set Initial amount to 0 on every price tier on the product, and make sure Minimum amount is blank or 0 on each of them. One tier left without an initial amount still gets the automatic seat.
Initial amount is also the way to stop a member tier from being preselected: set it to 0 so a logged-in member starts on nothing and picks for themselves.
Link parameters can still override this. See Link parameters.
Member prices
A member price is a price tier with Only for members set to the membership. The Price on that tier is what a member pays for one seat when they book. It is not the price of the membership itself. The membership’s own price is set on the subscription product and is charged separately every period.
Example: a sauna session costs kr 200, and members of the kr 800 a month “Sauna 12 months” membership should pay kr 100 per session. Add a “Member” tier with Price 100 and Only for members set to Sauna 12 months. Do not enter 800. If members should book for free, set the Price to 0.
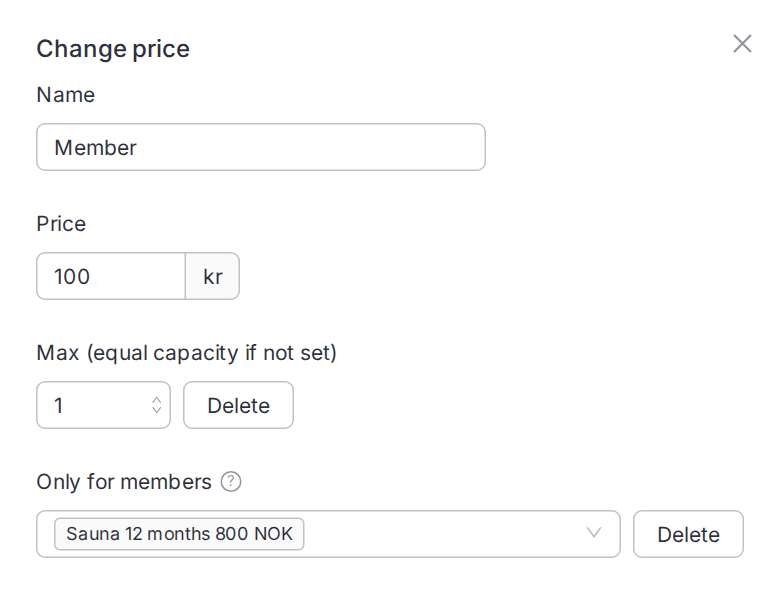
If only the member should receive that price, set Max to 1 so the member cannot also book guests at the member price. Guests then use the normal tier, unless you intentionally allow more member-priced seats.
Restrictions on bookings
You can limit how often a booking product can be booked. Add a restriction under Restrictions on the number of bookings for members or customers, choose what it applies to, and set three limits:
- Per session: how many seats can be booked in the same session.
- Per day: how many bookings can be made on the same day.
- Per month: how many bookings can be made in the same month.
A restriction applies either to a membership or to the customer:
- A membership: the limits count the bookings the member has made with that membership. When the member reaches a limit, the membership no longer applies to that booking and the customer is offered the regular price instead. The membership applies again as soon as the limit no longer applies, for example the next day or the next month.
- Customer: the limits count the customer’s own bookings, whether or not they have a membership. When the customer reaches a limit, the booking is stopped and the customer is told which limit was reached, for example that they have reached the limit of two bookings per day. Bookings you make yourself from the calendar are never stopped.
A customer restriction only works when the booking belongs to an account, so a product with one always asks the customer to sign in, even if “Everyone must sign in before booking” is off. Customers cannot continue as guests on that product.
Typical uses:
- Let members book any day, but not several times on the same day.
- Stop one member from booking out a whole week for themselves.
- Let every customer hold at most one seat per day on a popular product, members or not.
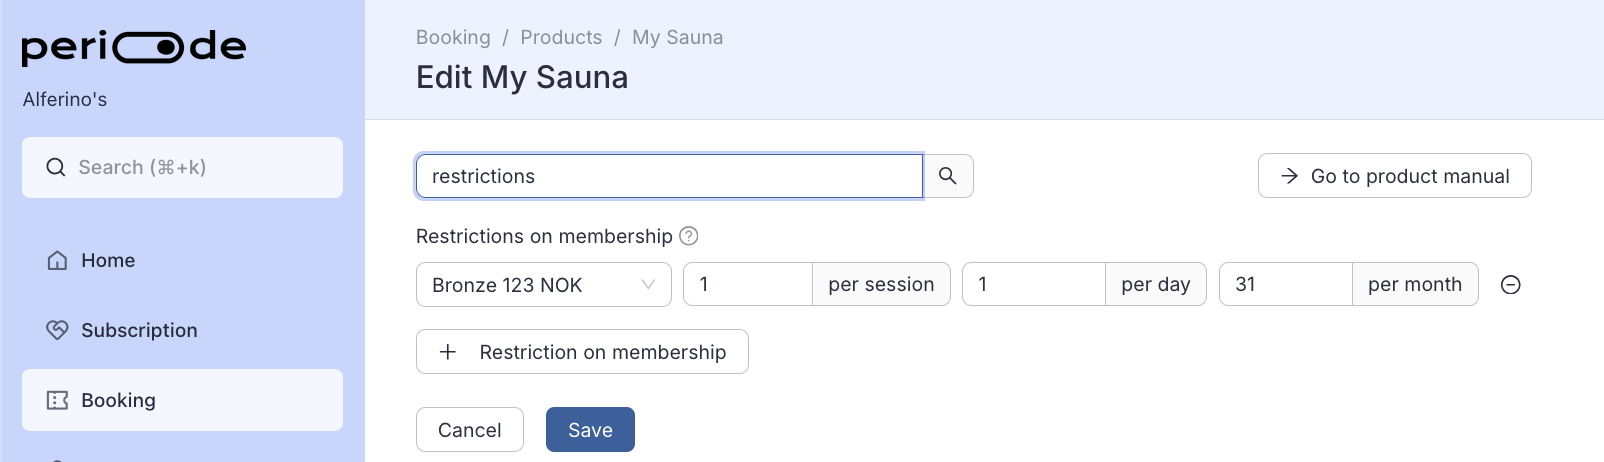
Which bookings the limits count is set under Products included in restriction, the same way for both kinds of restriction. Untouched, the limits count bookings on all your products. Add the setting and list products, and they count this product plus the ones you listed; add it and list nothing, and they count this product alone. The restriction says which of these it is doing right now, in the line under the limits. A customer with several memberships of the same type gets the limits multiplied accordingly.
Included sessions through punch passes
If a membership should include a fixed number of sessions per period, connect a punch pass to the membership instead of using an unlimited free member price. See Granting punch passes through memberships.
Campaign prices
For temporary pricing, adjust the relevant price tier or session price according to your campaign. If you want customers to see that a price is discounted, explain the offer in the product description.
Showing the price in the slot list
By default the booking page shows the price on the payment step, not in the list of times. If you want customers to see the price directly in the slot list under the calendar, turn on the price placement setting on the product (in the product settings, search for “placement”). With it on, each listed time shows its price, which is useful when different times or tiers are priced differently. Member-only and other restricted tiers still appear only to a signed-in customer who is entitled to them, so a discounted rate that is tied to a membership shows once that customer is logged in, not to everyone.
VAT
VAT is set per product. If the total a customer sees is higher than expected, check the VAT setting first.
Refund type
The booking product controls customer-side cancellation behaviour. The Refund type decides what a customer receives when they cancel within the allowed cancellation window.
Refund types can include money refund, gift-card credit, split refund, or no automatic refund, depending on product setup.
Admins can still decide what happens when cancelling or refunding manually from the Backoffice.
Time setup
Duration and interval
Duration is how long the session lasts. Interval is how often a new bookable start time appears.
For example, if a session lasts 90 minutes and you need 30 minutes before the next customer, use a 90-minute duration and a 120-minute interval.
Cancellation deadline
The cancellation deadline controls how long before a session a customer can cancel or reschedule according to the product rules.
Set this clearly and make sure the product text matches your policy.
Multiple session lengths
A product can offer several lengths, such as 1 hour and 3 hours. Configure this under advanced time details when customers should choose a short or long version of the same product.
Review price behaviour when using multiple lengths. Longer lengths may use a multiplier, and the product can also have a maximum price cap.
One-off length changes
If one specific slot should be a different length, edit that individual slot in the calendar, see Edit one slot.
Schedule setup
Weekly pattern
The weekly schedule is the normal pattern Periode uses to create sessions.
Set the normal opening windows for each weekday, then publish sessions from that schedule. Avoid overlapping schedule blocks unless the product is intentionally designed for overlapping availability.
Start times that cannot be booked
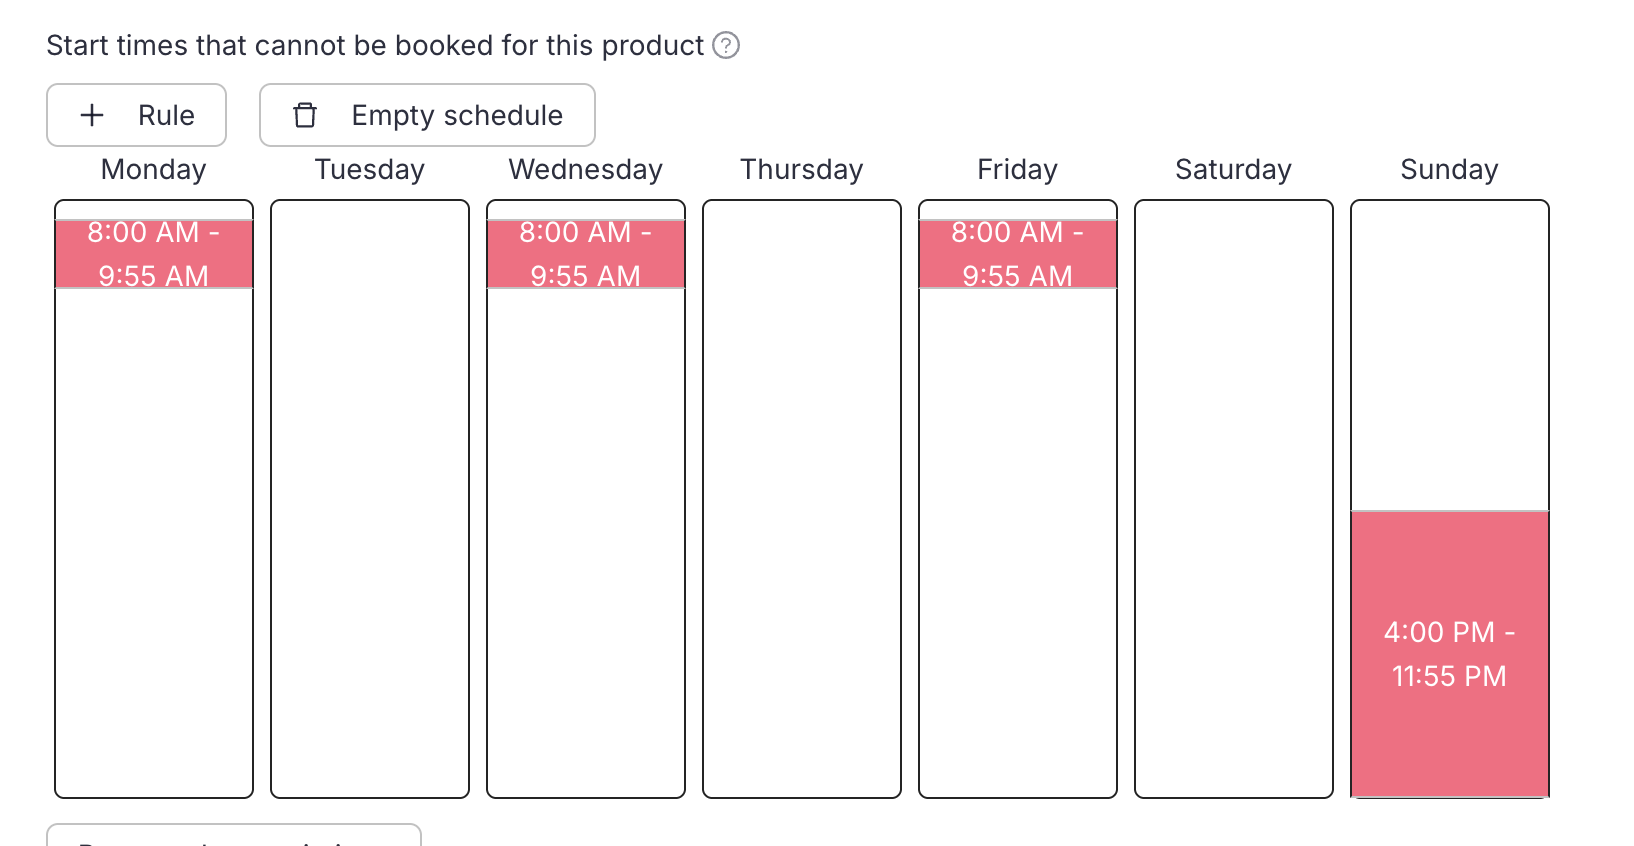
The “Start times that cannot be booked for this product” setting blocks time ranges per weekday. Any session whose start time falls inside a blocked range cannot be booked on the product you are editing. Sessions that start outside the blocked ranges are unaffected, and the underlying schedule is not changed.
The blocked range is inclusive on both ends. A start time that lands exactly on the start or the end of a range is also treated as unavailable, so keep that in mind when you set the range edges.
This is most useful for linked products. A linked product takes its schedule from the main product, so blocking start times is the way to limit the hours when the linked product itself can be booked, without editing the main product’s schedule. See Linked products and shared capacity.
One-off exceptions
Use one-off calendar edits for exceptions, such as one special session, one closed slot, one temporary capacity change, or one named session. See Edit one slot.
Session messages
Add a message to a session to show extra information on the session itself. The customer sees it on the session when booking, so use it for a practical note tied to that session, such as a theme, a host, what to bring, or a change of conditions. The message supports basic formatting and can run to more than one line.
There are two places to set it, depending on whether the note should repeat or apply once:
- From the schedule. Each slot in the weekly pattern has a Message field. A message set here shows on every session that slot generates, so use it for information that is always true for that recurring session.
- From the calendar. Open the session in the product calendar and edit the slot to set or override its Message. This affects only that one published session, so use it for a one-off note. See Edit one slot.
Keep the message short and tied to what the customer needs to know before booking or arriving.
When a customer reschedules a booking themselves, the first line of each session’s message shows next to the time in the list of times. When they pick a session, the rest of its message shows below the list. A session with no places and only a message is listed with its message, but the customer cannot move a booking to it.
Today’s messages
A today’s message applies to a whole date rather than a single session. The customer sees it above the session times when they select that date, so use it for a date-wide note such as a closure, special opening, holiday hours, or an announcement.
Set today’s messages on the booking product. Each entry has a date, the message text, and an optional link. When a link is set, the whole message becomes clickable — for example to point the customer at another product or page.
A date can carry a today’s message even when it has no bookable sessions, so this is also how you surface a note on an otherwise empty day.
Capacity and availability
Total capacity
Capacity is the number of available seats for each session.
A product with capacity 1 works like a private booking. A product with higher capacity works like a class, shared sauna, group session, or activity with several available seats.
Seats per booking
Seats per booking controls how many seats one customer can buy in a single booking. This is separate from total session capacity.
Use it to allow group bookings while still controlling how much of a session one customer can take.
Overlapping sessions and capacity
Capacity is counted per session. If sessions overlap in time, meaning a new start time appears while an earlier session of the same product is still running (a start interval shorter than the duration), Periode does not pool the overlapping sessions into one shared live seat count. Overlap is only safe in two cases:
- The sessions are set to be independent of each other, so each overlapping session keeps its own separate capacity, or
- The product has a capacity of
1, where any overlap simply blocks the slot (a private booking).
For a shared space with more than one seat, such as a communal sauna, do not model it as long sessions on a short interval. The seats will not add up across the overlap and you can oversell. Instead make the sessions short and non overlapping by setting the interval equal to the duration, and turn on Multiple session lengths so a customer can book several back to back slots in one booking when they want a longer visit. Every seat is then counted correctly.
Closing availability
To block a session from further booking, close the session or set capacity to 0. Existing bookings are not automatically cancelled just because capacity is reduced, so handle those customers separately.
Depending on product display settings, full or zero-capacity sessions may still appear as unavailable. If you want unavailable sessions hidden, check the product display settings for unavailable times.
Waiting list
Enable a waiting list when customers should be able to register interest after a session is full.
When a seat frees up, customers on the waiting list are notified. Treat it as a notification list rather than a guaranteed priority queue unless your product setup uses another workflow.
Named sessions and session types
Named sessions
Named sessions let you label individual slots inside the same product, for example Silent hour, Guided session, Family session, or Women only.
You can add named sessions in two ways:
- Add the name to the weekly schedule pattern when the session repeats.
- Edit a single published slot when the named session is a one-off exception.
Session-type filter
If enabled, the session-type filter lets customers narrow the calendar to a specific named session type.
Use this when one product contains several recurring session types and customers need a quick way to find the right one.
When named sessions are not enough
If the session needs separate membership rules, a separate price model, different capacity, different reporting, or must always be full price, create a separate booking product instead.
Booking groups
What booking groups do
A booking group shows several booking products together in one customer-facing view.
Each product keeps its own rules: schedule, price, capacity, waiver, access setup, and reporting. The booking group is the combined presentation layer.
When to use booking groups
Use booking groups for:
- Several saunas or rooms in one venue.
- Multiple courts or facilities.
- Private and shared options shown together.
- Several locations in the same area.
- Regular and guided sessions shown in one journey.
Sharing a group
Share the booking group link when customers should choose between several products. Share the direct product link when customers should book one specific offer.
Discount codes
Creating codes
Discount codes are created for booking products when you want campaigns, partner offers, staff offers, or temporary promotions. Add them on the booking product, in the Discount code section. The Code is the text the customer types at checkout. Keep it short and memorable, and note that once a code has been used you can still edit it but not change what past bookings were charged.
Type and amount
The Type decides how the code changes the price:
- Set the price of a seat to: fixes each seat to the amount you enter. Enter
0to make the seat free. - Reduce the price of a seat by: subtracts a fixed amount from each seat.
- Total price as percentage for entire order: takes a percentage (0 to 100) off the whole order.
The Price field holds that amount: a money value for the first two types, or the percentage for the third.
Where and when it applies
- Products: choose which booking products accept the code. Use Select all to apply it to every product. A code only works on the products listed here.
- Valid for bookings in period: the code applies only to bookings whose session date falls inside this range. This is the date of the booked session, not the date the customer redeems the code, so you can sell a code now for sessions within a set window. Use this range, not a
0limit, to expire a code by date. - Availability: optional time windows (day of week and time of day). A booking’s start time must fall inside one of these intervals for the code to apply. Use it for off-peak or happy-hour codes.
- Internal note: a private label for your own reference. It is never shown to customers.
Single use
There are two different meanings of “single use”, and mixing them up is the common mistake:
- One use per customer: turn on Can only be used once (requires sign-in). Each signed-in customer can redeem the code once and no more. Because it has to count per person, it requires sign-in. Use this for one-per-person promos, welcome offers, or a member perk.
- One use in total: leave that toggle off and set Max bookings total to
1. The first booking that uses the code consumes it for everyone, first come first served.
You can combine the two, for example once per customer together with a cap on total redemptions.
Rules
Toggles under Rules:
- Can only be used once (requires sign-in): one redemption per signed-in customer (see Single use above).
- Requires sign-in: the customer must be logged in to use the code, even when it is not limited to once per person.
- Can be used multiple times per day (only relevant when free): a free code (price set to
0) is normally limited to one use per day per customer. Turn this on to allow several same-day redemptions. - Cannot be used by members: active members are blocked from using the code, so a public promo does not stack on top of member pricing.
- Can be used on member-only sessions: lets the code apply to sessions that are otherwise restricted to members.
Limits
Fields under Limits:
- Max bookings total (across all users): the total number of bookings that may use the code before it stops working. Leave blank for unlimited. Note
0also counts as unlimited here, so set a real positive number to cap it. - Max seats total (across all users): the total number of seats the code may discount across every use. Leave blank for unlimited, and do not set
0, which can make the code unavailable. - Minimum number of people: the order must include at least this many seats before the discount applies.
- Max people per booking: the discount applies to at most this many seats in one booking. Any extra seats pay full price.
General rule for the limit fields: leave a field blank when it should be unlimited, and use a real positive number to cap it. Do not use 0 as an expiry value; expire a code with the valid period above instead.
Placement in the booking flow
Some products let you choose where the discount code field appears in the customer booking flow and what label customers see.
Use this to place the code field where it makes sense for your checkout.
Waivers and extra fields
Waivers
A booking product can require a waiver. Use waivers when customers must accept safety rules, confirm responsibility, provide required information, or sign before receiving access details. The customer reads and signs it when they book, and the signed copy is kept on the booking.
For products with door pincodes, the customer may need to complete the waiver before the code is shown.
Adding a waiver to a booking product
A waiver is written once and can be used by several products. The first time you turn it on for a product, you write it there and then.
-
Open the product under
Booking > Products, click Change product, and type “waiver” in the Search for setting box at the top. The editor shows the Waiver setting.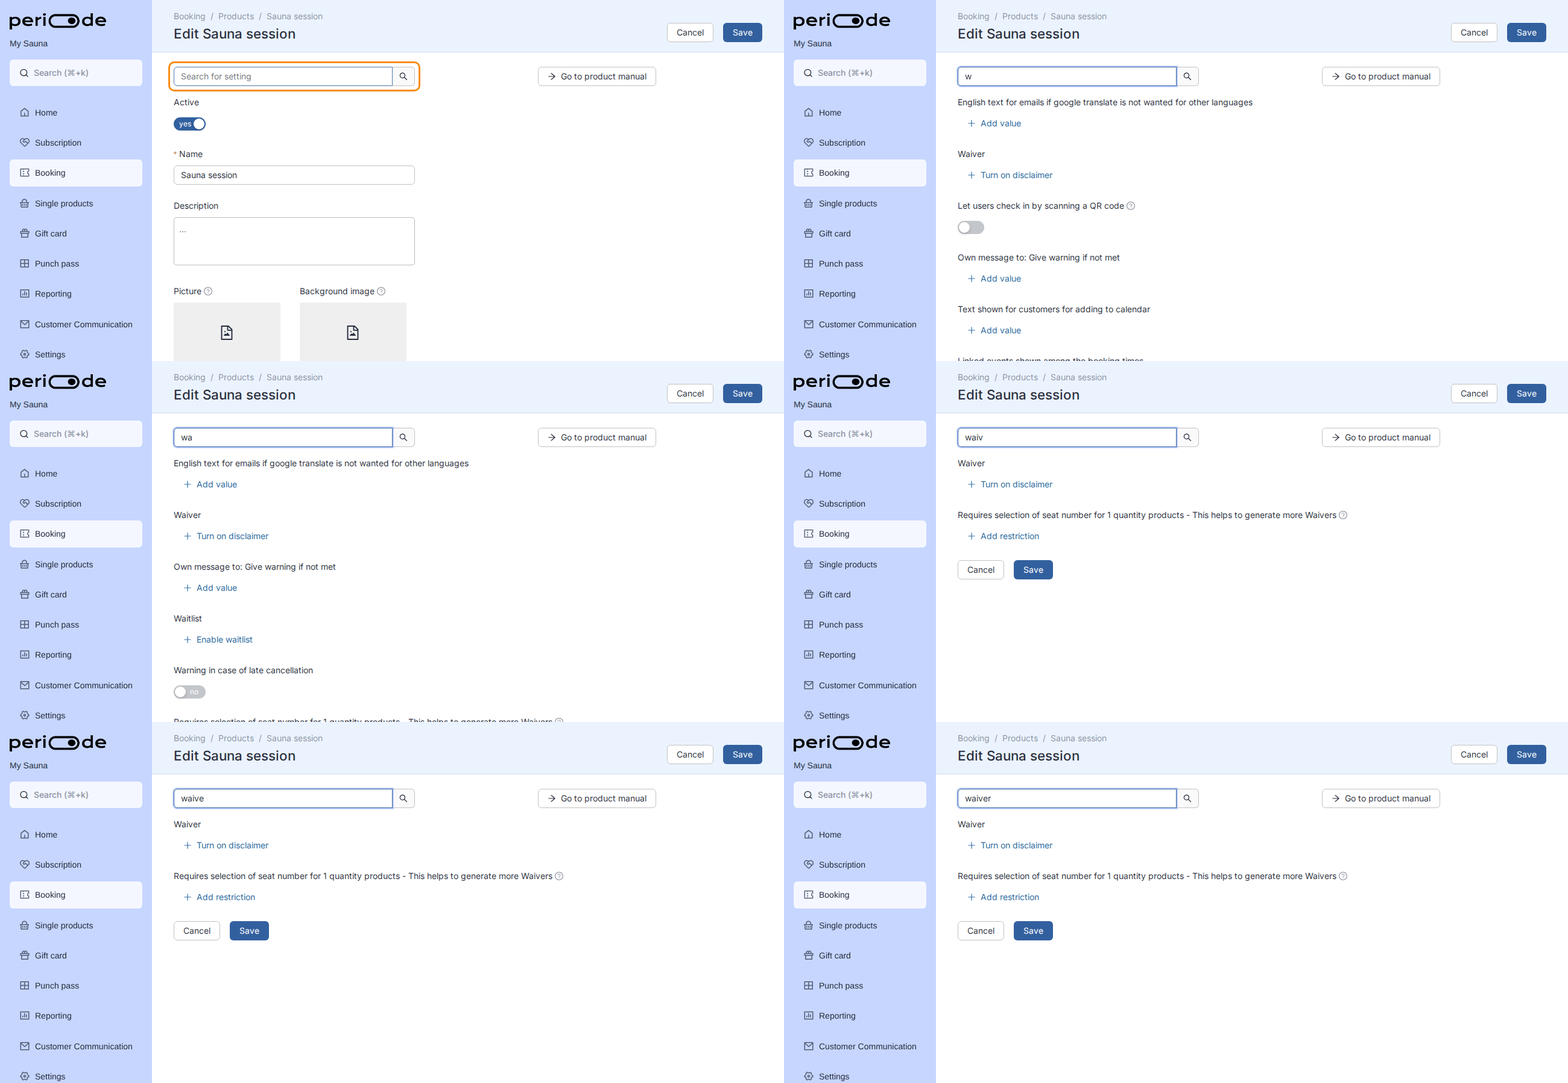
Search for "waiver" to jump straight to the setting. -
Click Turn on disclaimer. If you have no waiver yet, the Waiver admin dialog opens by itself. If you already have one, the product picks your first waiver and you open the dialog with Waiver administration.
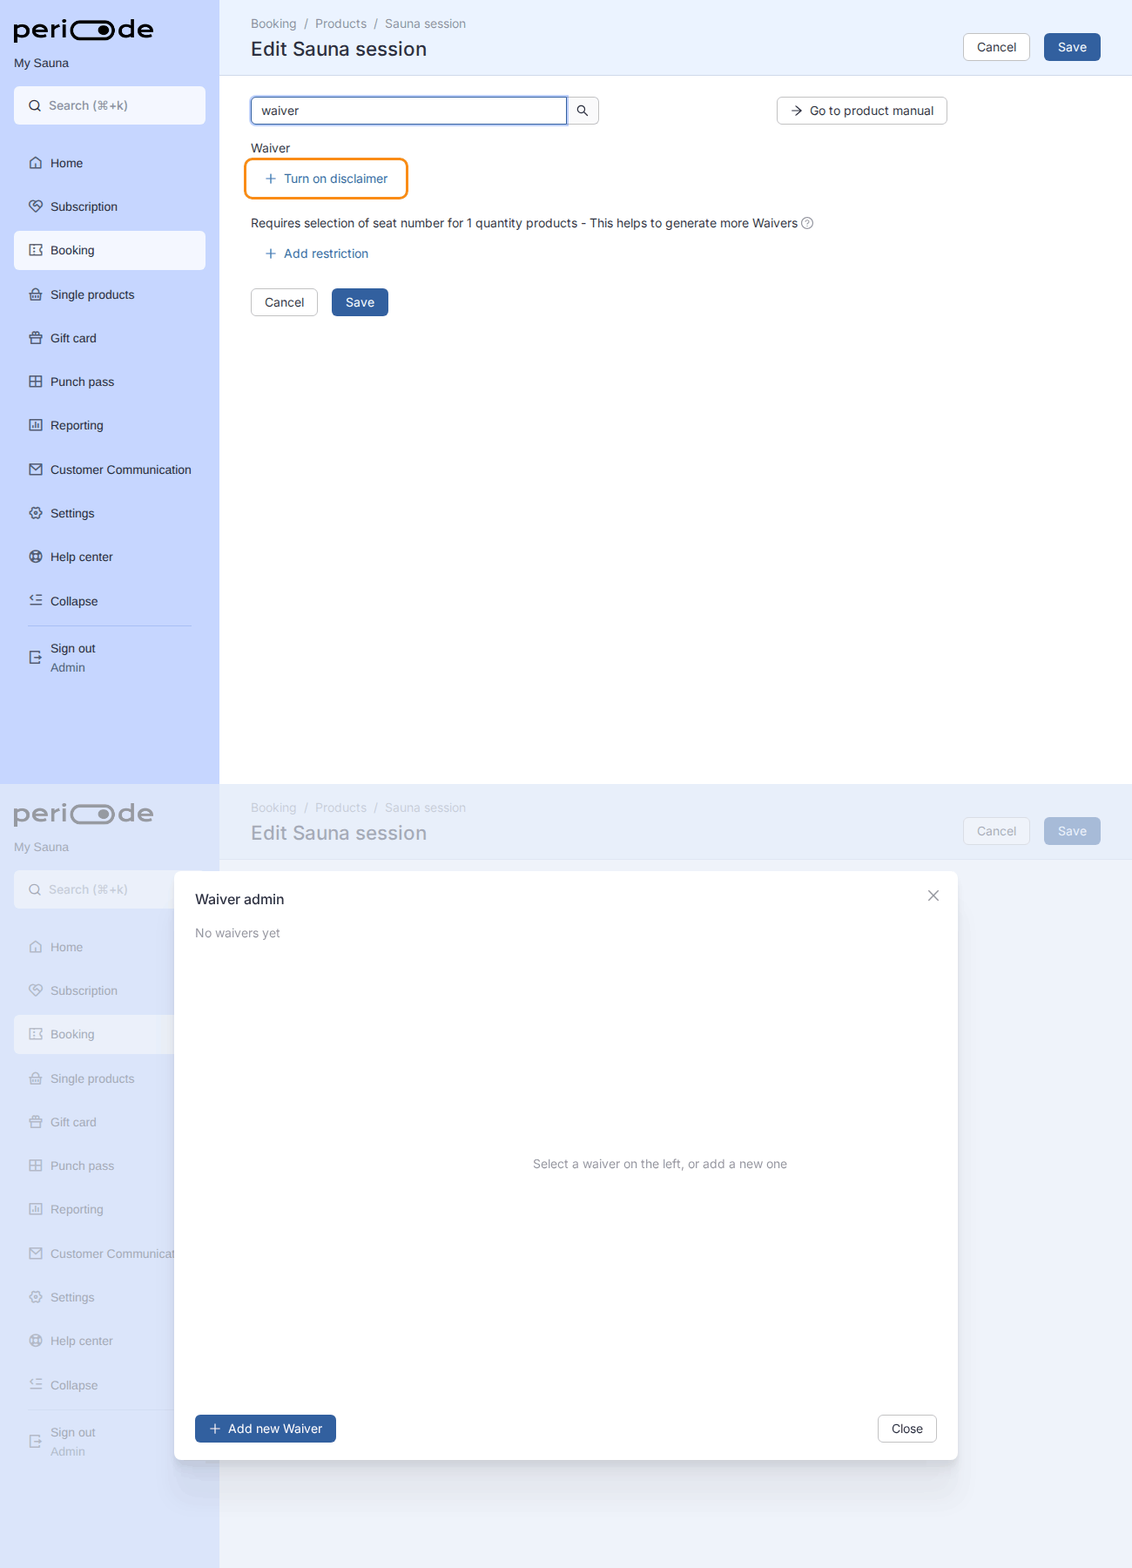
Turn on disclaimer opens the Waiver admin dialog when the merchant has no waiver yet. -
Click Add new Waiver. Give it a Name, which is what you see in the Backoffice, and a Title, which is the heading the customer sees. Click Save.
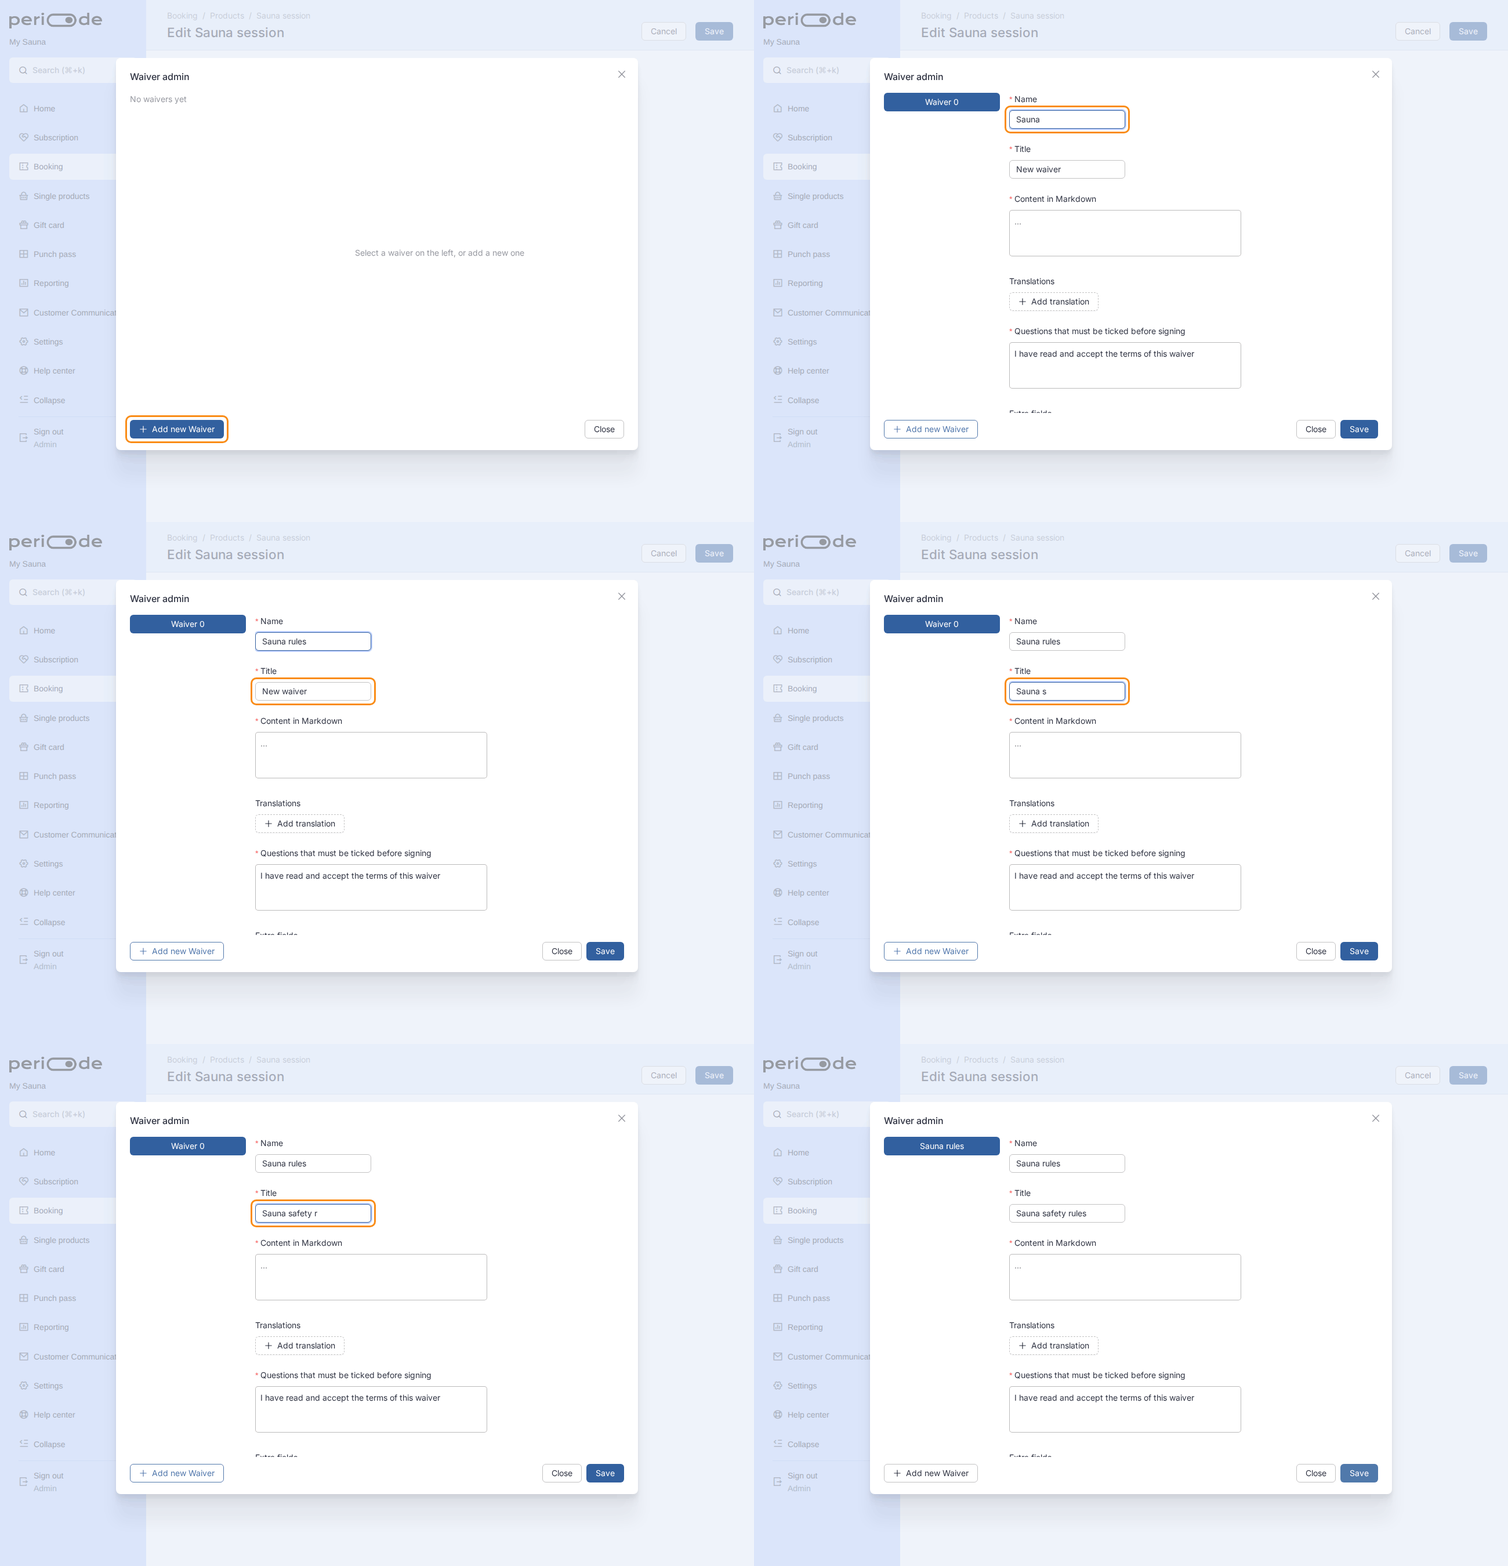
The Name is for you, the Title is for the customer. -
Click the Content in Markdown box to write the waiver text. Type or paste the rules the customer must accept, click OK, and click Save in the Waiver admin dialog. The text supports Markdown, so headings and lists work.
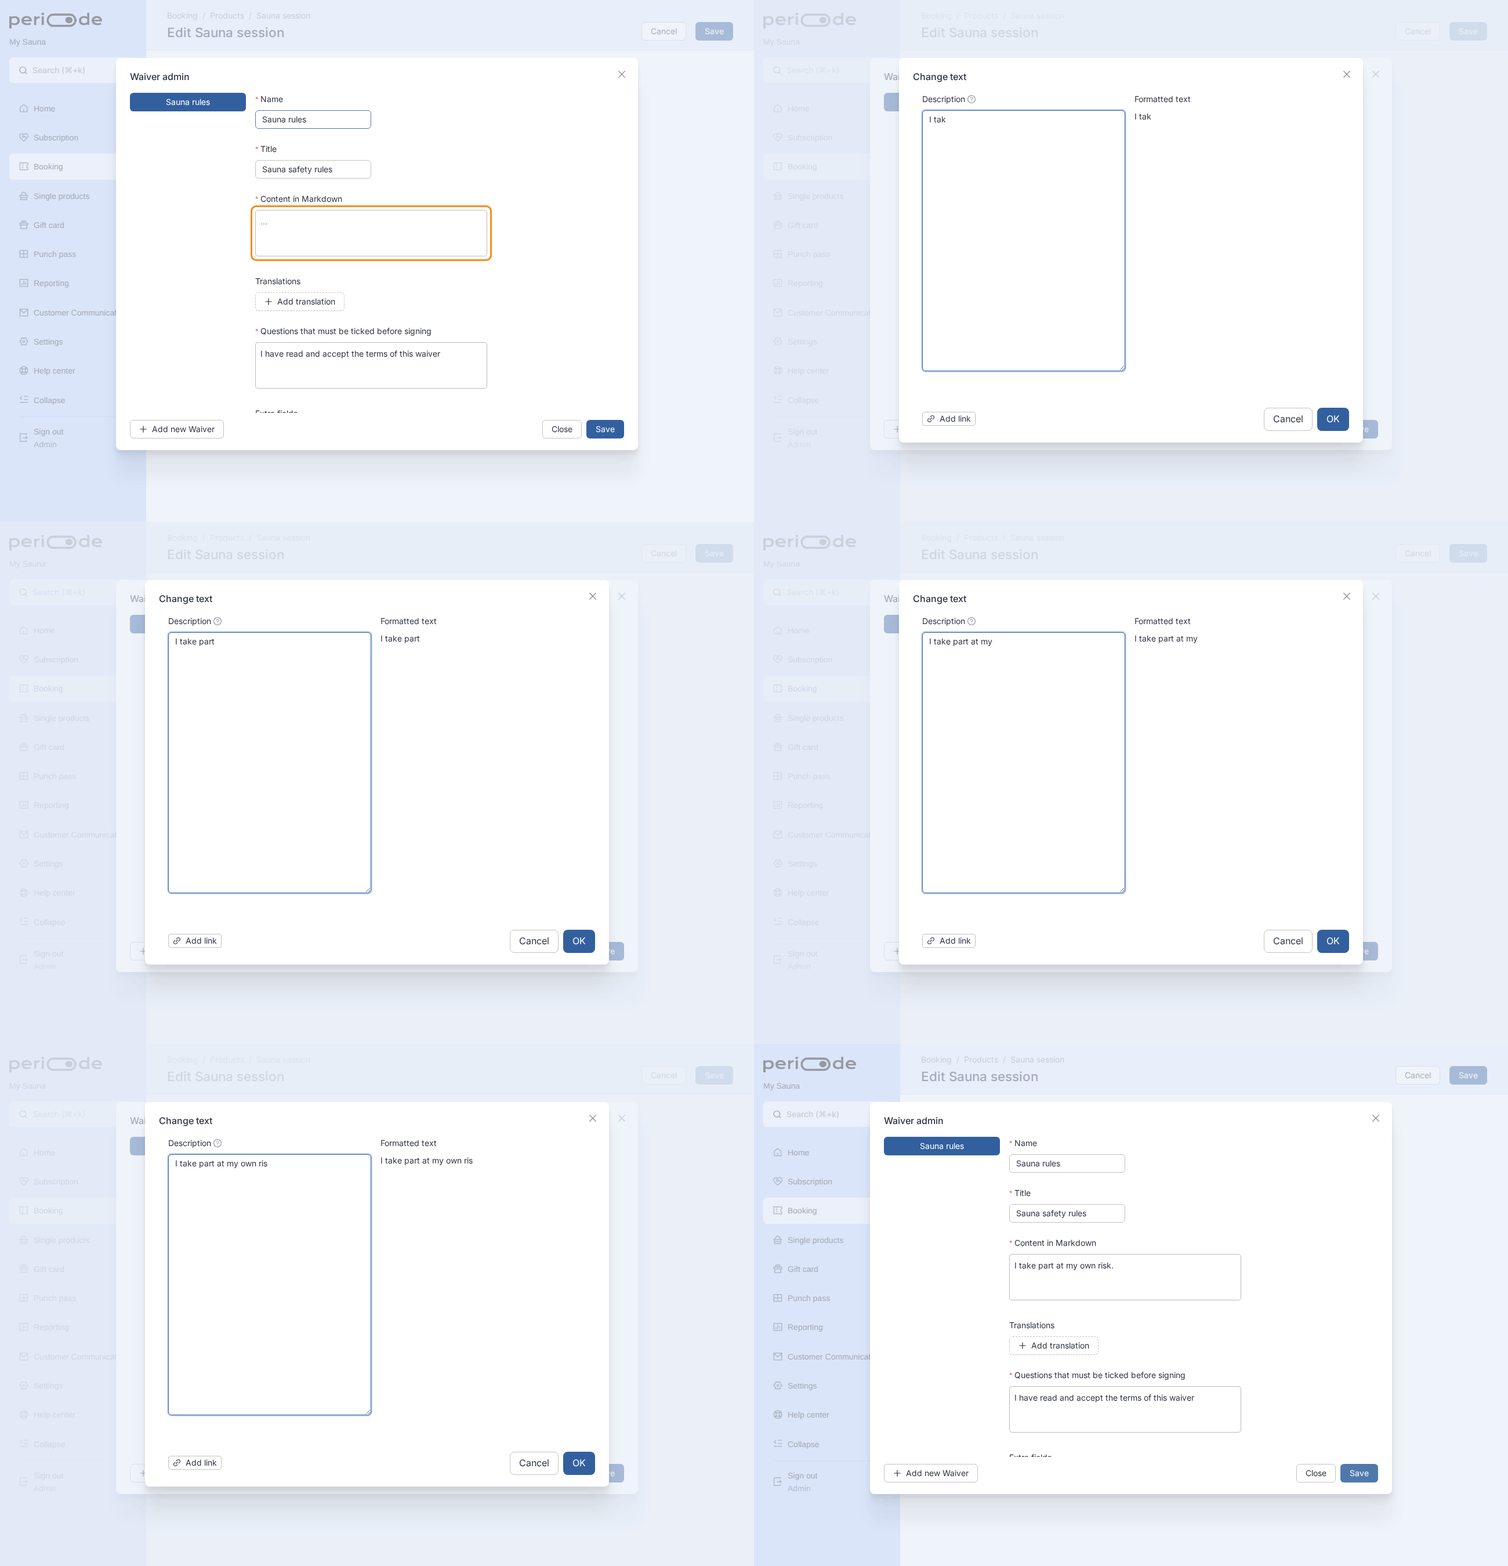
The content box opens a text dialog. Confirm with OK, then Save the waiver. -
Close the dialog. The product now shows the waiver in the picker under the Waiver setting. Click Save at the top of the editor to attach it to the product.
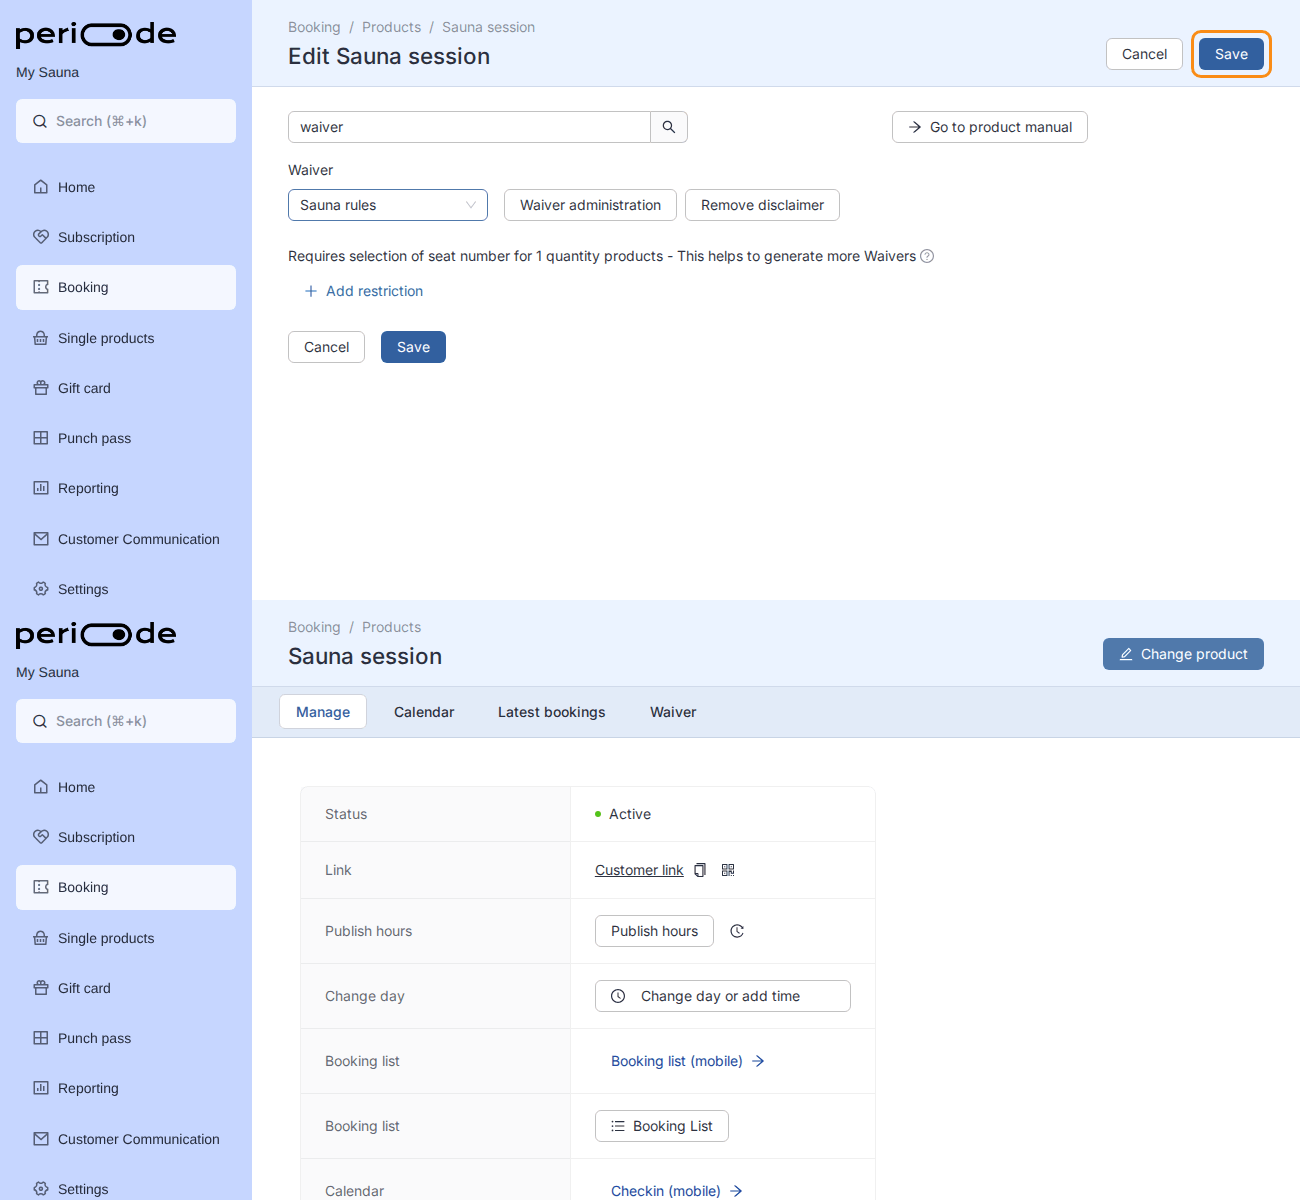
The waiver is only attached once you save the product. Save takes you to the product page, which now has a Waiver tab.
Questions that must be ticked before signing, translations and extra fields live in the same dialog. To use the same waiver on another product, turn on the disclaimer there and pick it from the list.
Extra customer fields
Extra fields collect information during booking. Use them for details staff need before the session, such as age range, experience level, postal code, accessibility needs, participant names, or other questions.
Keep required fields limited to information you actually need. Too many required fields can reduce completion rates.
Optional extras
Extra choices
Optional extras let customers add something to the booking, such as towel rental, fire-lighting service, equipment, refreshments, or other add-ons.
Extras can be paid, free, or used as a negative-price adjustment depending on setup.
Time-specific extras
Extras are best when they can apply broadly to the product. If an extra should only be available for specific sessions, create a separate product for those sessions or handle the offer in another controlled way.
Linked products and shared capacity
Shared capacity
Products can be linked so booking one affects availability in another. This is useful when two products use the same resource, such as a communal sauna and private sauna that cannot be sold independently for the same time.
When a private product should reserve the whole shared space, set how many communal seats one private booking consumes to the communal capacity. If your communal sauna seats 7, one private booking must take all 7, otherwise a private booking only removes a single communal seat and the rest stay bookable. The link count and the communal capacity should match.
A linked product takes its schedule from the main product. To limit the hours a linked product can be booked without changing the main product, use Start times that cannot be booked on the linked product.
Add-on products
A product can be set so it cannot be booked by itself. Use this for add-on style products that must be booked together with another product.
Be careful after bookings exist
Do not change linking casually after a product already has bookings. Shared capacity affects availability logic, customer booking paths, and reporting.
Sharing with customers
Booking links
Each booking product has a customer-facing link. Share it from your website, email, social media, ads, customer messages, and QR codes.
Use a direct product link for one specific product. Use a booking group link when customers should choose between several products.
QR codes
QR codes are useful at physical locations, posters, receptions, partner venues, and unmanned sites.
For customer check-in, use the check-in QR code flow described in Booking calendar.
Booking codes and door pincodes
Booking code before purchase
A product can require a booking code before a customer is allowed to book. Use this for private, invite-only, staff-only, partner-only, or restricted sessions.
This is different from a door pincode. A booking code controls who can book. A door pincode controls how the customer enters after booking.
Door pincodes
Door codes can be handled in several ways:
- A lock integration that creates a unique code per booking.
- A partner integration that manages access and heating.
- A static pincode shared by customers.
- A weekly rotating static code.
- A fixed code written in the reminder email.
- A code supplied by an external system through the Booking API.
For unmanned locations, combine access setup with waivers and check-in rules. If a customer cannot see the pincode, see Customer cannot see a door code.