
Account and settings
Use Settings to maintain the business, access, customer-account, and payment setup behind your Periode account.
Organization settings
Business details
Keep the organization details current before sharing customer-facing links. These details can appear across booking pages, membership signup, receipts, customer emails, and customer account pages. Edit them under Settings > Company.
Review:
- Business name.
- Public contact information.
- Support email.
- Legal details.
- Terms and conditions links.
- Customer-facing text that explains who the customer is buying from.
Company settings
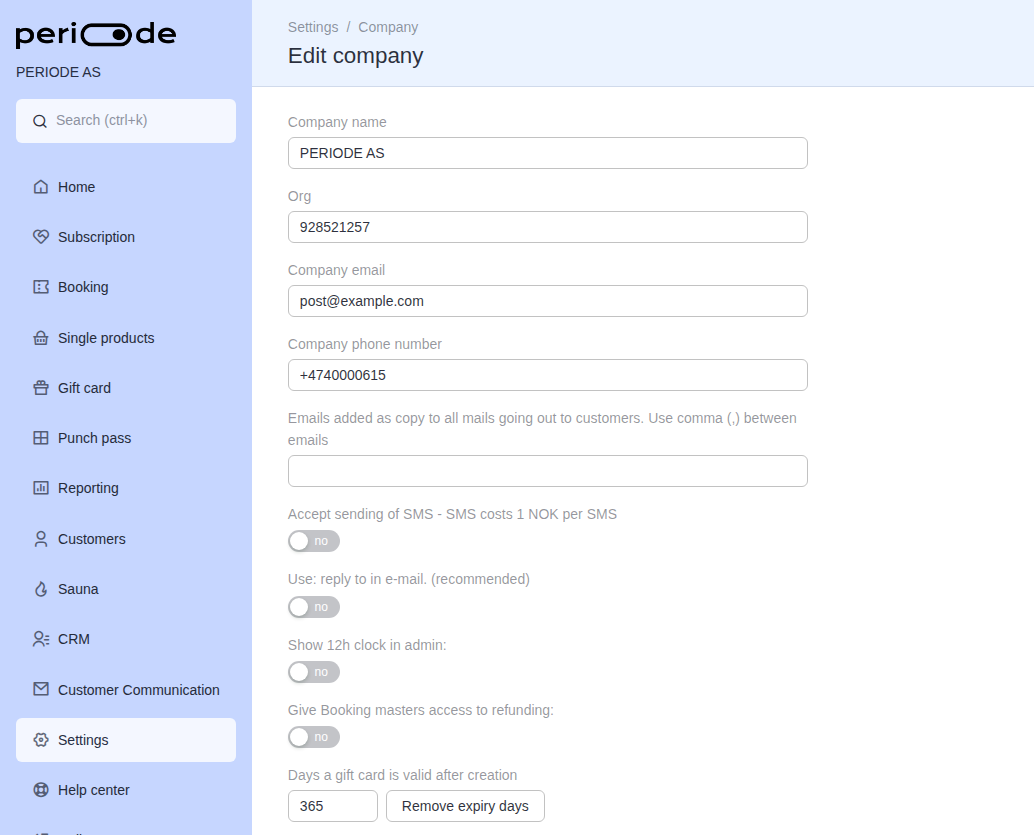
Open Settings > Company and press Edit to change the settings below. Press Save when you are done.
- Company name and Org: the legal name and organization number shown to customers on receipts and in e-mails. These are set by Periode when the account is created. Contact kontakt@periode.no to change them.
- Company email: your contact address. Customers see it as the address to reach you, Periode sends notifications about new customers and orders to it, and customer replies go here when reply to is on (see below).
- Company phone number: the phone number shown to customers as your contact number.
- Emails added as copy to all mails going out to customers: every e-mail Periode sends to a customer (booking confirmations, receipts, reminders, and so on) is also sent as a hidden copy to these addresses. Separate several addresses with a comma. This is useful for keeping an archive of what customers receive, but expect a lot of e-mail.
- Accept sending of SMS: allows Periode to send SMS to your customers, for example reminders. For SMS terms please see periode.no/pricing.
- Use: reply to in e-mail (recommended): all e-mails to customers are sent from
noreply@periode.no, with your company name as the sender name. When this is on, a customer who presses Reply on one of those e-mails sends the reply to your Company email instead of to the noreply address. When it is off, replies go tonoreply@periode.noand nobody reads them. Keep this on so customer questions reach you. It does not change which address the e-mails are sent from. - Show 12h clock in admin: shows times in the backoffice as 2:00 PM instead of 14:00. This only affects what staff see in the backoffice, not what customers see.
- Give Booking masters access to refunding: Booking Masters can normally cancel bookings but not refund them. Turn this on to let Booking Masters refund bookings as well, both to the original payment method and to a gift card. Leave it off if only Admins should handle money.
- Days a gift card is valid after creation: how many days a gift card can be used after it is bought. The default is 365 days. Press Remove expiry days if your gift cards should never expire. The change applies to gift cards sold after you save. Gift cards that already exist keep their expiry date.
Terms and conditions
Add terms and conditions links to products where customers need to accept rules before purchase. This is especially important for memberships, recurring payments, cancellation terms, waivers, access rules, and products with commitment periods.
The customer should be able to understand:
- What they are buying.
- What they pay now.
- What they pay later if it is recurring.
- What they can cancel or change.
- What rules apply to access, safety, or attendance.
Admin users
User roles
Manage staff access under Settings > Users.
Use the role that matches the work the person should do:
- Admin gives broad access, including settings, products, refunds, customer data, exports, and reports.
- Restricted Admin gives admin access with restrictions set by the organization.
- Booking Master gives access to booking-related work, such as calendars, bookings, check-in, and day-to-day booking operations.
- Restricted Booking Master gives access only to selected booking products.
- Custom gives access according to the custom permission setup.
The technical role IDs are admin, restrictedAdmin, bookingMaster, restrictedBooking, and custom.
Restricted Booking Master access
Restricted Booking Master access has two parts.
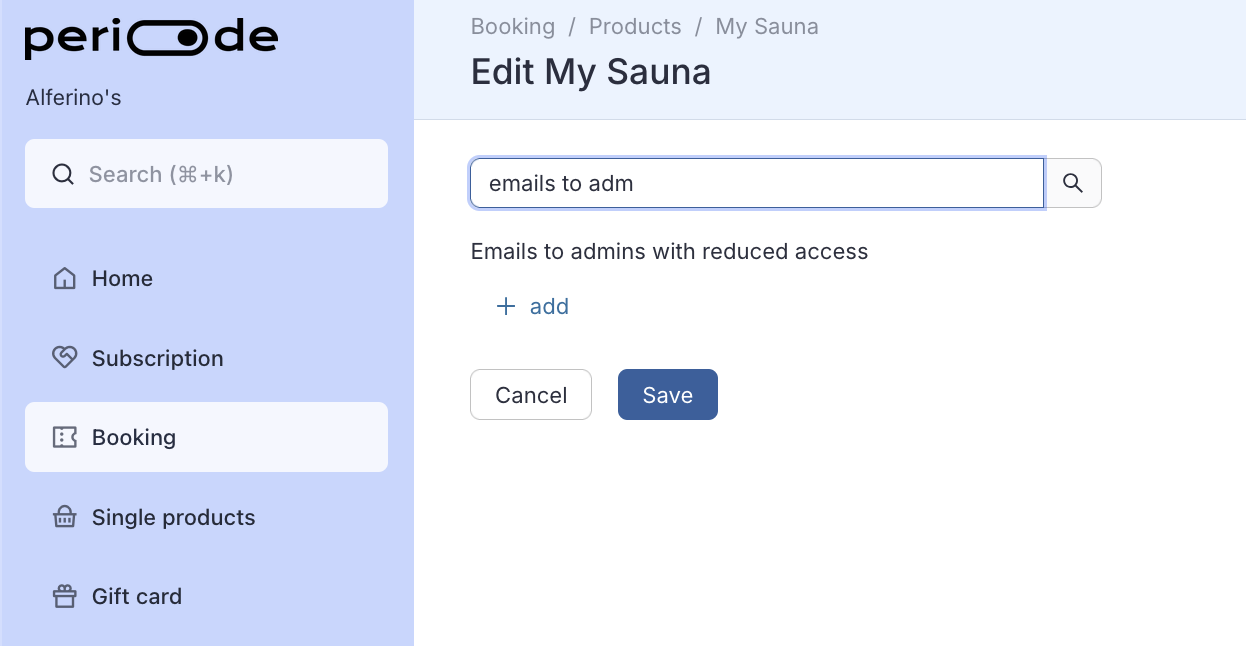
First, create the user with the Restricted Booking Master role. Then open each booking product the user should manage and add that user’s email in the product access settings. This may be done by going into the actual product and changing the “Emails to admins with reduced access”.
If a restricted user cannot see a product, check both:
- The user’s role under
Settings > Users. - Whether the user’s email has been added to the specific booking product.
Staff access routines
Keep staff access clean:
- Give staff the least access that still lets them do their job.
- Remove access when staff leave.
- Update roles when responsibilities change.
- Avoid sharing one admin login between several people.
- Use restricted access for location-specific or product-specific staff.
Customer accounts
Search for a customer
Use the top-left search in the Backoffice to find a customer quickly. Search by email when possible, since customers can have similar names.
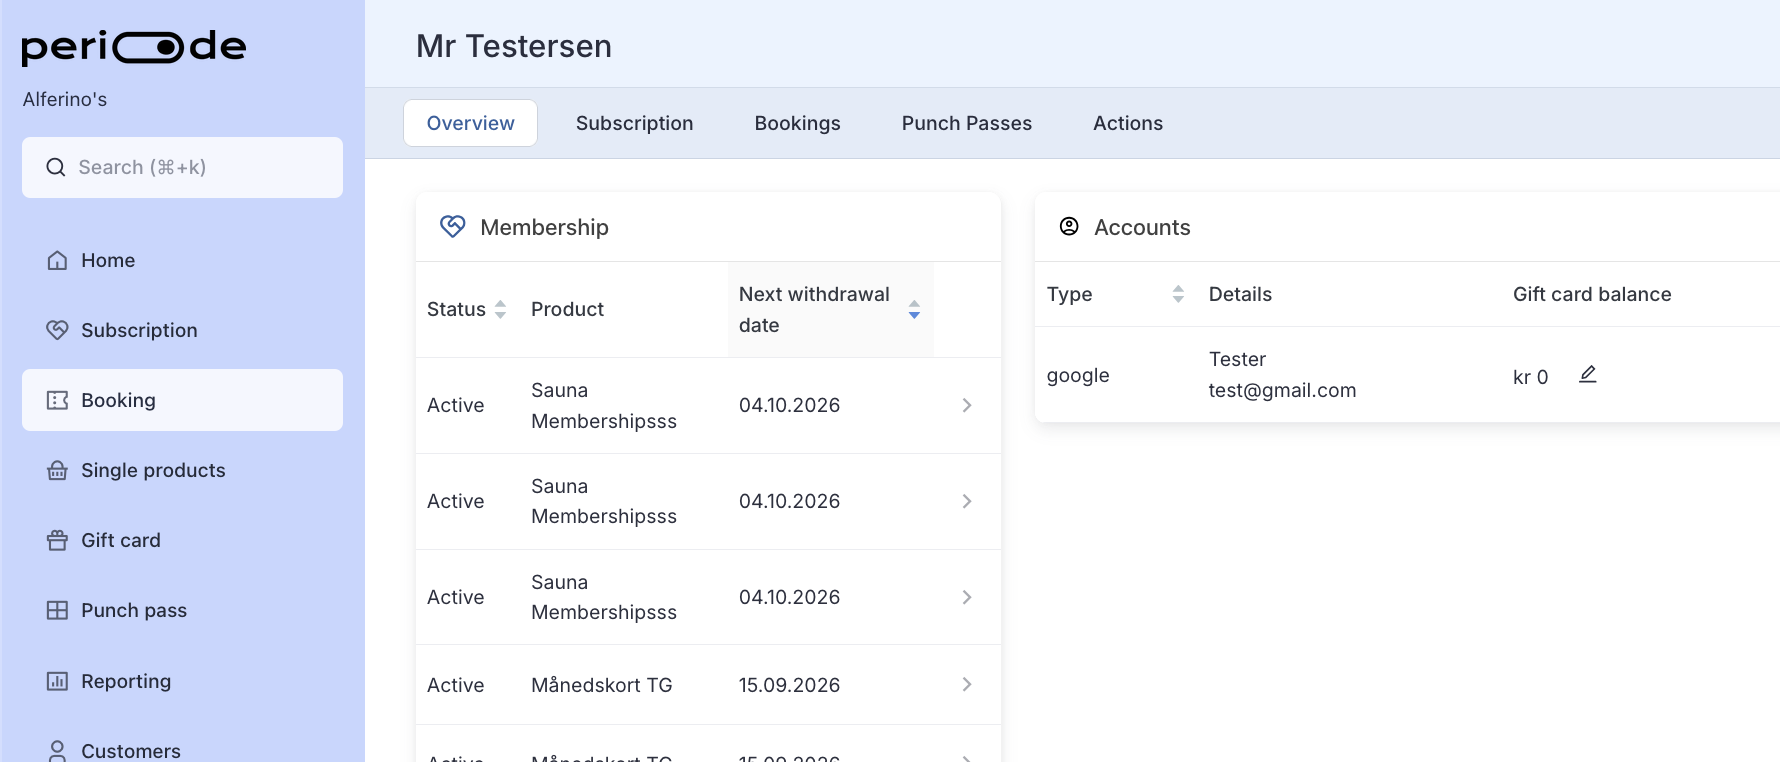
Open the customer account overview to review:
- Customer details.
- Bookings.
- Memberships or subscriptions.
- Gift card balance.
- Punch passes.
- Login method.
- Purchase and support context.
Login methods and customer identity
Many support cases are account-identity cases. A customer may use one email on a private phone, another email at work, and Vipps or email login at different times.
If a customer cannot see a membership, member price, gift card balance, punch pass, or booking, check which account owns the item and ask the customer to log in with that same account.
Typical examples:
- A customer bought a membership with one email and books with another.
- A customer uses a work email on a work computer and a private email on mobile.
- A customer bought with Vipps but later logs in with an email account that is not connected to the purchase.
- A personal punch pass was redeemed by the wrong account.
- Gift card balance was added to the wrong customer.
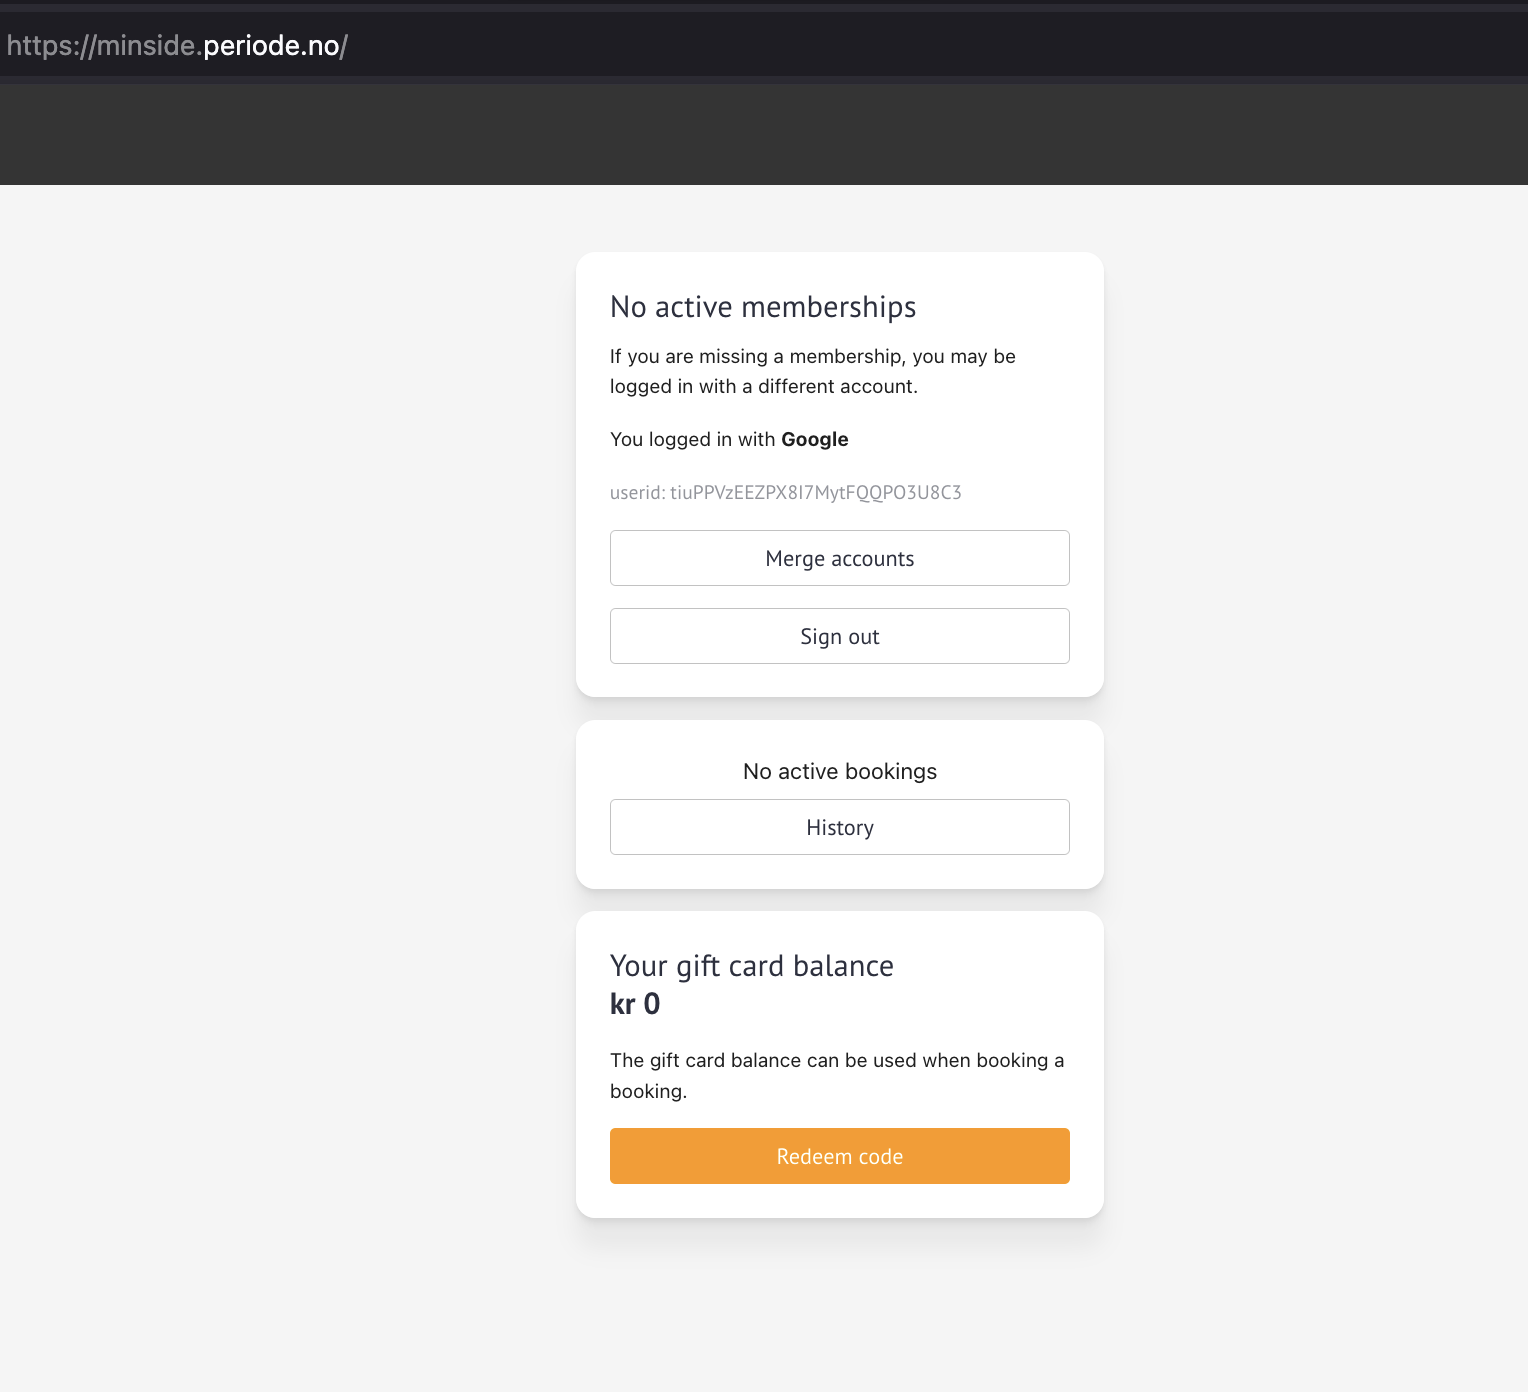
How can I know how a customer has logged in?
The easiest way is to send them to minside.periode.no and ask them to take a screenshot, as this will show their active login method. The most common culprit by far is that someone has logged in with a different medium, for example their work email.
Editing customer details
Open the customer account overview when customer details need to be corrected.
Be careful when editing email-related information. Email is often used to connect purchases, login, membership benefits, confirmations, and customer communication.
Payment settings
Means of payment
Integrated payment setup lives under Settings > Means of payment.
Use this area to:
- Start or review payment-provider setup.
- Check whether payment setup is active.
- Confirm which payment methods are available.
- Review payment-related setup before launch.
After payment setup is completed, activation is usually handled automatically. Before launch, complete a real customer-flow test so you know payment, confirmation, receipt, and product access all work together.
Periode versus payment provider
Periode manages products, checkout, bookings, memberships, gift cards, punch passes, refunds, customers, and reports, while the payment provider handles payment processing, settlement, and payouts. For reconciling the two, see Provider reports and payouts.
Settings review checklist
Before launch or after major account changes, review:
- Organization details.
- Public contact information.
- Terms links.
- Admin users and roles.
- Restricted booking access.
- Payment setup.
- Branding.
- Customer-facing product links.
- Test customer account flows.