
Booking calendar
The booking calendar is where admins run bookings day to day. Use it to view sessions, add walk-in bookings, check customers in, reschedule, cancel, adjust availability, message customers, and handle one-off changes.
Use Booking products for setup and calendar generation. Use this page for operating the sessions that already exist on the calendar.
Viewing the calendar
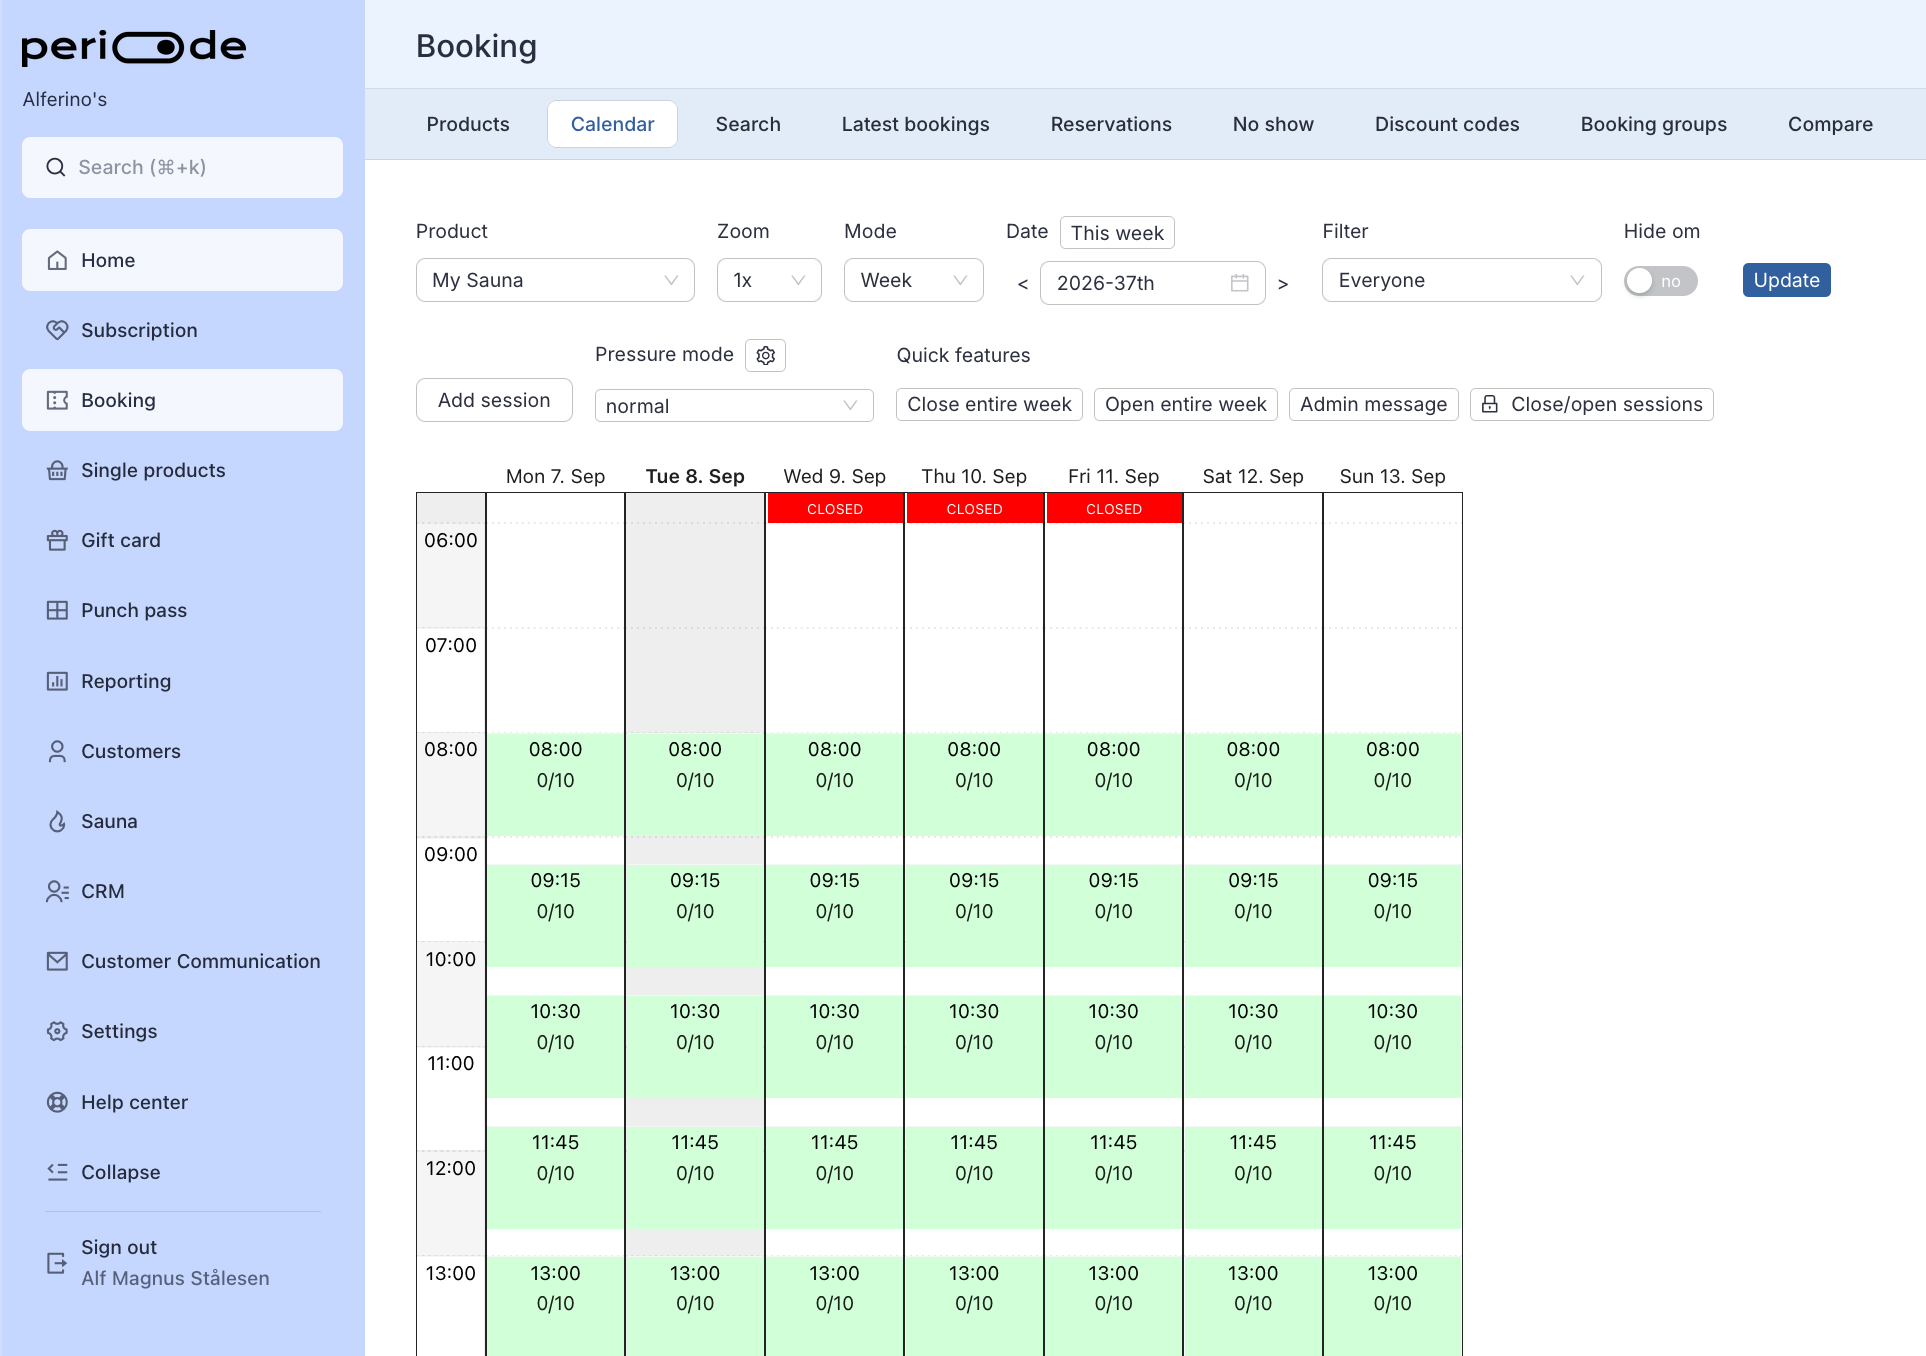
Product calendar
Each booking product has its own calendar of published sessions. A session is a specific date and time customers can book.
Use the calendar to check:
- Which sessions are available.
- How many seats are booked.
- How much capacity remains.
- Who has booked.
- Whether customers have checked in.
- Whether a session needs to be opened, closed, edited, or cancelled.
Click a session to open its details and manage the bookings connected to that time.
Booking groups
To see several products side by side, add them to a booking group. See Booking groups for setup.
Named sessions and the session-type filter
A single product can have differently named sessions on the same calendar, such as Guided session, Silent hour, Family session, or Women only. If the product setting is enabled, customers can use the session-type filter to narrow the calendar to a named session type.
Named sessions are set up on the product schedule or by editing a single slot. See Named sessions and session types.
Who can manage the calendar
Admin access
Full admins can see and manage all products, settings, refunds, reports, and customer data.
Booking Master access
Booking Masters can work with booking-related operations such as calendars, sessions, bookings, check-in, and day-to-day customer help.
Restricted Booking Master access
Restricted Booking Masters only see the booking products they have been added to. See User roles and Restricted Booking Master access for the setup.
Managing live sessions
Open a session
Click a session on the calendar to see the bookings, customer details, capacity, check-in status, and available actions for that time.
From the session view, admins can usually:
- Add a new booking.
- View or edit existing bookings.
- Check customers in.
- Cancel a booking.
- Adjust availability.
- Close or reopen the session.
- Send messages where messaging is enabled.
Edit one slot
Edit a specific calendar slot when the change should only affect that slot.
Use this for:
- One-off capacity changes.
- One-off named sessions.
- A one-off session message shown to the customer on that session. See Session messages.
- Maintenance blocks.
- Special opening times.
- Closing a single session.
Edit the product schedule instead when the change should repeat.
Opening and closing sessions
Closing a single session takes one date and time off sale while leaving the rest of the product schedule untouched. Use this for one-off changes such as maintenance, bad weather, a private hire, a staff shortage, or a heating fault, when you do not want to edit the recurring schedule.
Both actions are on the cog wheel on the session. You do not need to publish hours afterwards. The change applies immediately to that single session.
Close a session
Open the product calendar, find the session, and click its cog wheel. Then choose one of:
- Edit session and set the capacity to
0. The session stays visible on the calendar but no longer accepts bookings. - Delete session. The session is removed from the calendar.
Closing a session does not cancel or refund customers who are already booked. Handle them separately, for example by messaging them, moving them to another session, or cancelling and refunding. See Cancel or close a session.
Reopen a session
How you reopen depends on how you closed it:
- If you set the capacity to
0, open the session’s cog wheel, choose Edit session, and set the capacity back to its normal number. - If you deleted the session, publish the product’s hours. Publishing regenerates the schedule and adds the session back with its normal availability.
Note that publishing hours restores any session you closed by setting capacity to 0 or by deleting it, because publishing rebuilds the schedule from the product settings. If you want a block to stay in place, do not republish that product’s hours.
These changes only affect the single session you act on. For other one-off slot changes see Edit one slot, and to change every future session edit the product schedule under Booking products.
Admin-side bookings
Add a walk-in or front-of-house booking
Admins can add a customer to a session from the Backoffice.
Open the booking calendar, click the relevant session, choose New or Add booking, and enter the customer details.
From there you can:
- Search for an existing customer.
- Select the correct customer account.
- Create a new customer if they do not exist yet.
- Add the booking details.
- Capture required details or waivers if the product requires them.
This is the right workflow for walk-ins, phone bookings, front-of-house bookings, or customers who need help booking.
Match the right customer account
When possible, search by email. This helps connect the booking to the customer’s existing account so they can see it later.
If the customer has a membership, gift card balance, or punch pass, confirm they are using the same account before you complete the booking.
Check-in
Check customers in from the session
Open the session and use the check-in list to mark customers as arrived.
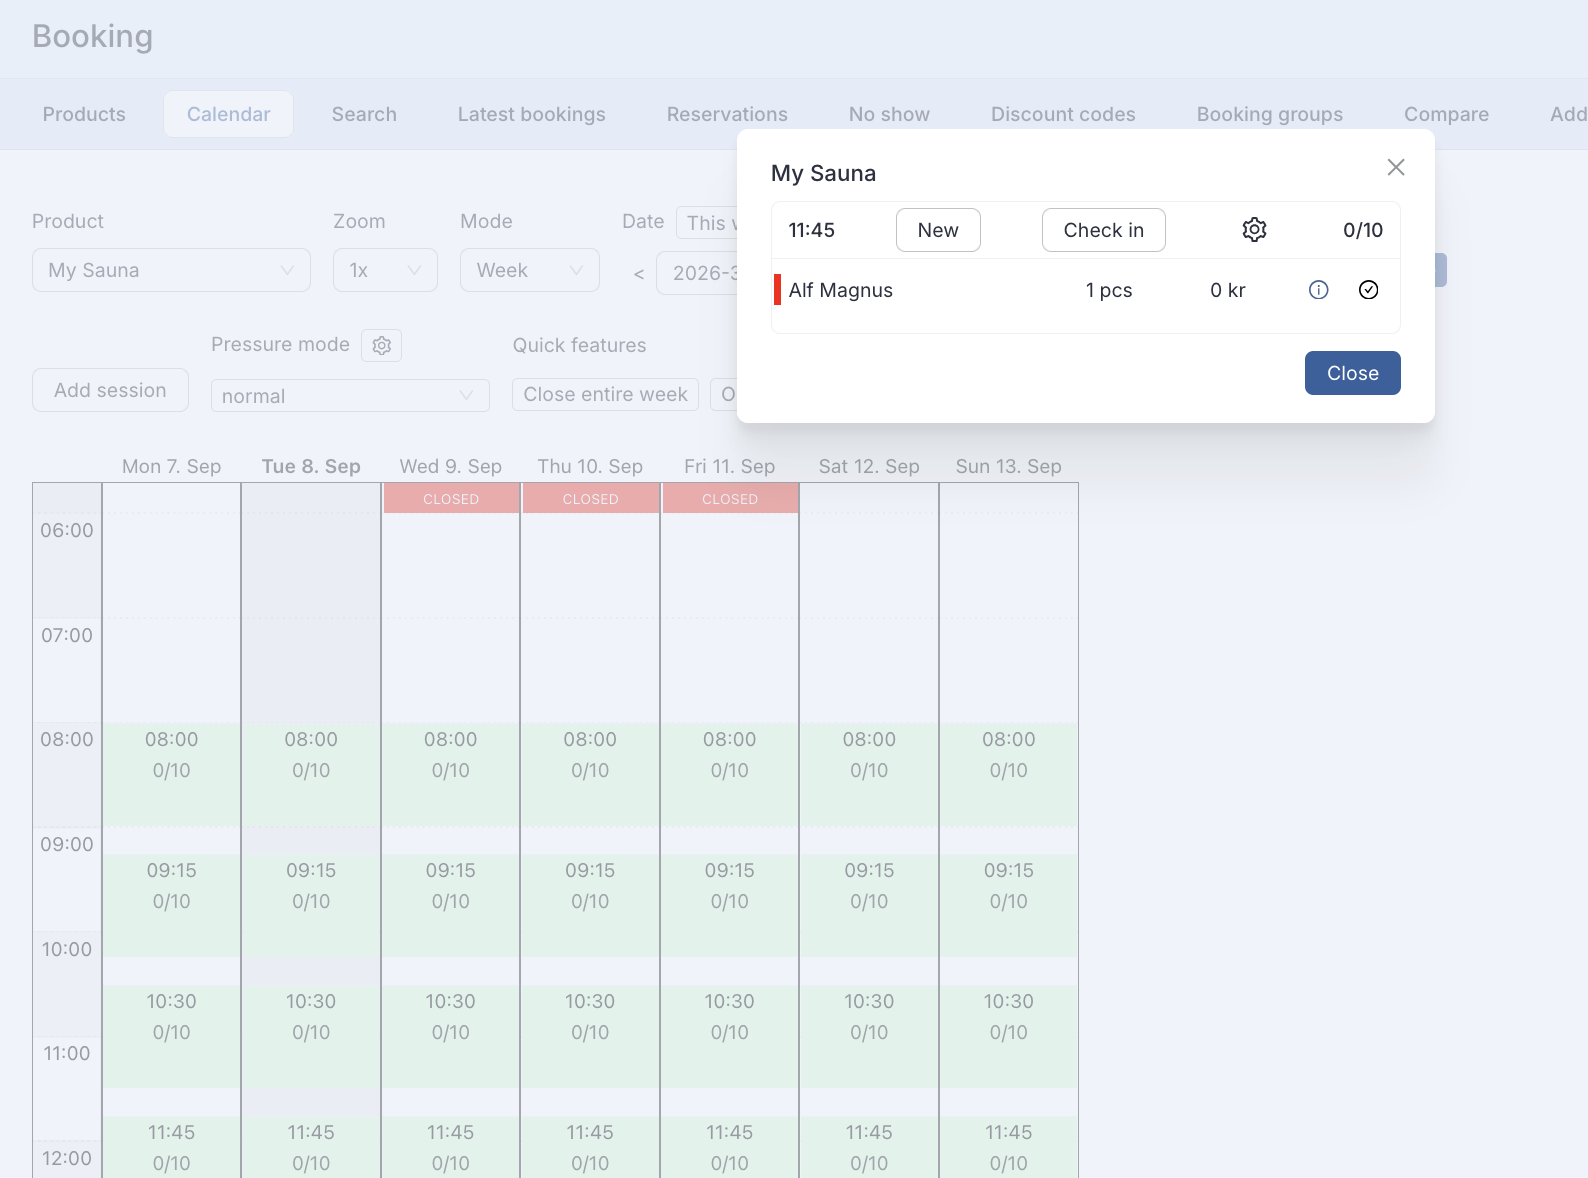
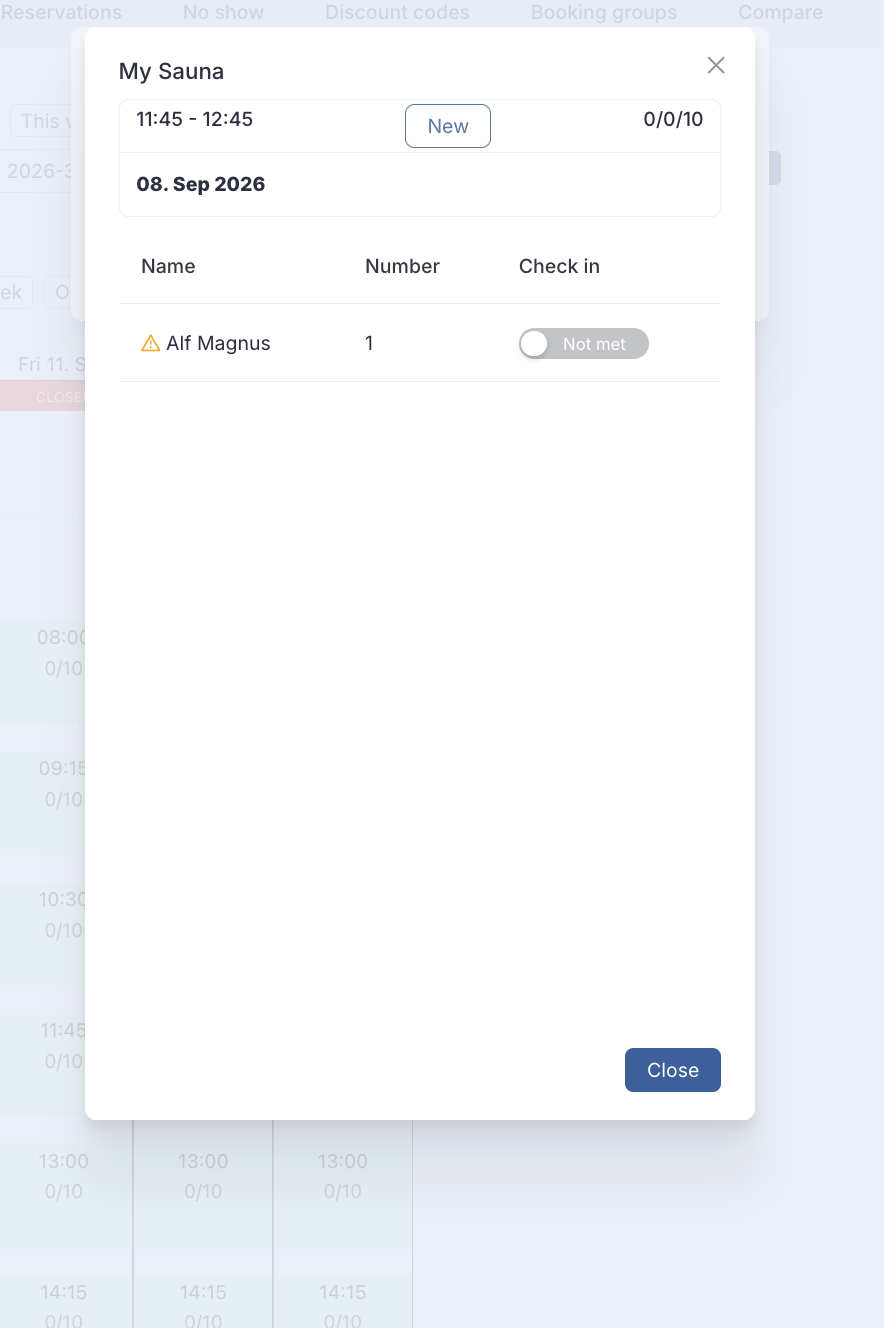
Check-in is useful for:
- Attendance tracking.
- Front desk control.
- Confirming the correct customer arrived.
- Reporting on usage.
- Unmanned-location routines.
The check-in view does not flag first-time visitors. Use booking history or reporting exports when you need to identify first-time or returning customers for follow-up.
A red exclamation icon next to a name means the customer is on your booking notification list. See Per-customer booking notification.
Check-in QR code
For unmanned locations, you can let customers check themselves in by scanning a QR code at the door instead of being checked in by staff.
Two things have to be in place:
- Turn on Allow users to check in by scanning a QR code on each booking product that should allow it. Open the product under Booking and search for “check in” to find the setting.
- Print a QR code pointing at the check-in link and put it up at the location. The link is
https://minside.periode.no/checkinBooking/<your merchant id>, and it is shown as a tooltip on the setting itself. For a booking group there is a ready-made Link to check-in for booking group on the group, with a copy button and a QR-code button next to it, and that one only checks customers in on the products in that group.
When a customer scans the code they are asked to sign in, and Periode then checks in the booking they hold for that day, as long as it starts within about an hour. If they have no such booking, the page tells them so and nothing is checked in. Customers who are checked in this way show up as checked in on the session, the same as if staff had done it.
Rescheduling
Admin rescheduling
To move a customer to another time, open the booking and use the available change or reschedule action. Choose the new session and confirm the change.
Before rescheduling, check:
- The new session has capacity.
- The customer is eligible for the new session.
- Any price difference or product rule is handled correctly.
- The customer should receive updated confirmation.
If the booking cannot be moved directly, cancel the original booking and create a new booking in the correct session.
Customer rescheduling
Customers can only move their own booking when the product allows it. The setting is Allow customers to reschedule between same or lower priced sessions on the booking product, off by default. Open the product under Booking, search for “reschedule” and switch it on. Until it is on, the customer sees no reschedule option, even though the booking link and the reminder email still work for everything else.
With the setting on you also control:
- Custom reschedule deadline: by default rescheduling follows the cancellation deadline. Tick this to give rescheduling its own deadline, for example cancellation up to 24 hours before but rescheduling up to 2 hours before.
- Products the customer can reschedule to: the product itself is always allowed, so the customer can always pick another time on the same product. List other products here when the customer should also be able to move across products. Products with a different length or different length options cannot be picked, and a communal product cannot offer private products (capacity
1) as targets.
Other rules that always apply:
- A customer cannot reschedule after the deadline has passed.
- Moving to a cheaper session does not refund the difference.
- A customer cannot reschedule into a waitlist.
Cancelling and refunding
Cancel one booking
To cancel a single booking, open the booking itself and choose the cancellation action.
When an admin cancels from the Backoffice, the admin can decide what should happen with the payment from the available options.
Customer cancellation
When a customer cancels their own booking, the refund behaviour follows the booking product settings. The cancellation deadline and Refund type decide whether the customer receives money, gift-card credit, a partial configured refund, or no automatic refund.
Always check the product settings before explaining cancellation behaviour to customers.
Cancel or close a session
Closing a session stops further bookings, but it does not automatically resolve customers who already booked.
If a full session cannot run, decide whether to:
- Cancel each booking.
- Refund money.
- Issue gift-card credit.
- Move customers to another session.
- Message the customers.
Finding a customer’s bookings
Search by name, email, phone or booking id
Under Booking > Search, pick Name, email, phone or booking id, type part of what you are looking for (at least 3 characters), and press the search button or Enter. Nothing is searched until you do, and the results table shows a spinner while the search runs. The search is fuzzy and ignores capitalisation, so “berg” finds “Nora Berg”, and a partial email or phone number works the same way.
Use this when you know who the customer is but not which session they booked.
The other search types
The remaining options match exactly, so they need the whole value, not a part of it:
- The user id option, for a customer’s account id.
- The discount code and gift card option, for every booking that used a given code.
- Punch pass, for the bookings a punch pass has been spent on.
- Signed waiver (email), for bookings with a waiver signed under that email address.
When a booking does not show up
Only finalized bookings appear here. A booking that is still held, unpaid or deleted lives under Reservations instead, see below.
Reservations
Reserved versus deleted
Under Booking > Reservations, you can see bookings by state. A reserved booking is held but not yet paid or finalized. A deleted booking has been removed.
Use this view when a booking is not in the normal confirmed list but still needs investigation.
Holding capacity
Where enabled, reservations can hold capacity temporarily before the final booking is confirmed.
Review reservations regularly so capacity is not blocked longer than needed.
Publishing sessions and resources
Publishing from the product schedule
Sessions are generated by publishing the product schedule, see Publishing.
If you add a resource or linked setup after sessions already have bookings, publishing may not change already-booked slots. The change usually applies to future sessions instead.
If a linked or resource product unexpectedly shows only a waitlist, first confirm the underlying sessions were published.
Messaging and alerts
Message customers on a session
Use the session view to contact customers connected to a specific session when messaging is available.
Typical messages include:
- Schedule changes.
- Cancellation information.
- Arrival instructions.
- Access or check-in reminders.
- Operational updates.
Keep the message short and specific to the session the customer booked.
Booking alerts
Booking alerts can notify admins when a booking is completed or changed. Configure per-product alerts in the product’s email and SMS settings where available.
Per-customer booking notification
Use Settings > Booking notification to get an e-mail when a specific customer books, for example a customer you do not want back. Add the customer’s e-mail addresses or phone numbers, and the e-mails of the admins who should be notified.
A booking from a customer on the list is marked as an unwanted customer, and the check-in lists show a red exclamation icon next to the name. The mark is set when the booking is made, so bookings made before you added the customer are not marked.
On a marked booking, the booking details show Booking Varsel above the product, with the internal message in red from the entry whose tracked e-mail matches the booking’s e-mail. The message is looked up live, so it disappears from the booking as soon as you remove the e-mail from the list.